

Tools and gear · Chapter 1
Homeoffice Setup
How to set up your home office for video calls: six areas to get right, then five lighting setups from one light to greenscreen, side by side.
Key takeaways
- Your home office is part of how customers see you. A calm background and good light build trust on every call.
- Get six areas right: camera position, lighting, audio, background, technology and organisation.
- Start with one good key light. Add fill, hair or background light as your budget grows. A greenscreen is optional.
Most of my discovery calls and demos happen on video. So the customer meets my room before they meet my product. I learned that the hard way, with a window behind me and a laptop camera pointing at my chin. This page is what I would tell my younger self.
Why Your Home Office Matters
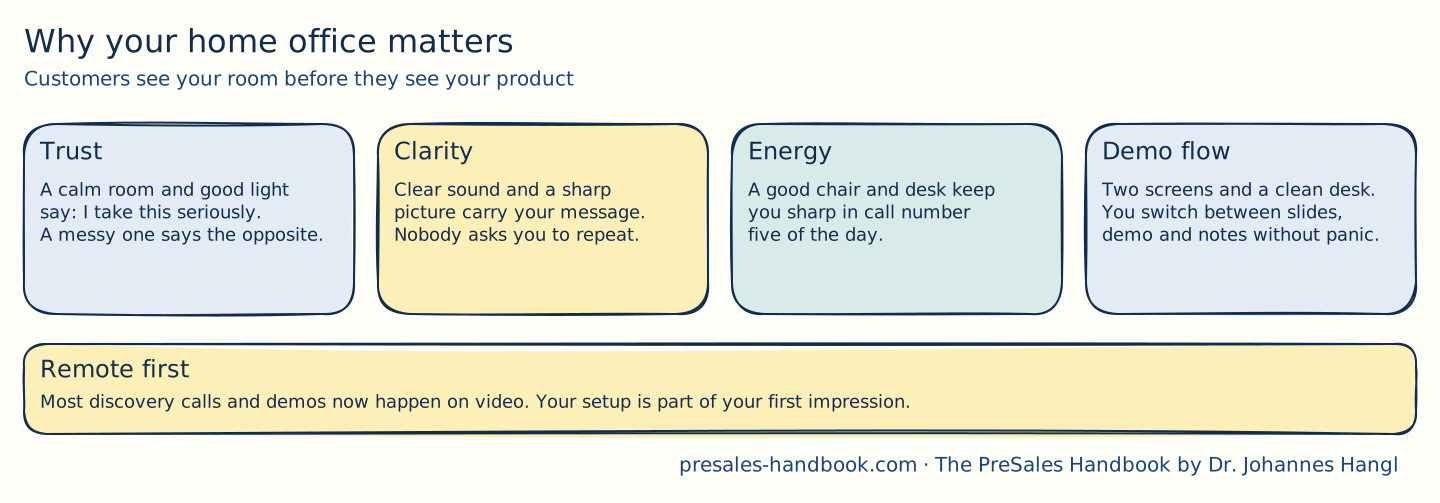
Trust. First impressions count, and remote ones count double. A tidy room and good light tell the customer you prepared. A dark face in front of a laundry rack tells them something else.
Clarity. Clear audio and video carry your voice and your face. Customers read your expressions, so they need to see them. And nobody wants to ask "sorry, can you repeat that?" three times.
Energy. A good chair and a desk at the right height keep you focused. That matters in call number five of the day.
Demo flow. Two screens or one wide screen let you run slides, the live demo and your notes at the same time. You switch without hunting for windows.
The Six Areas of a Presales Home Office
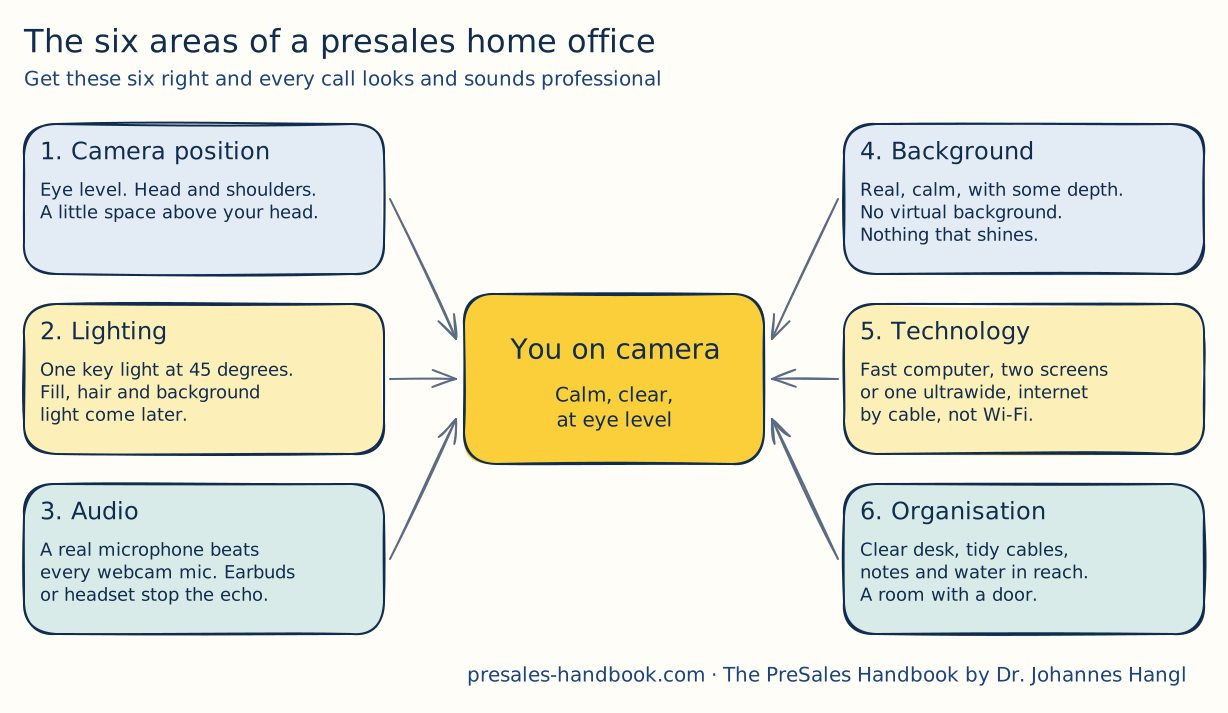
Lighting and camera position get their own drawing, because that is where most setups go wrong.
Camera Position
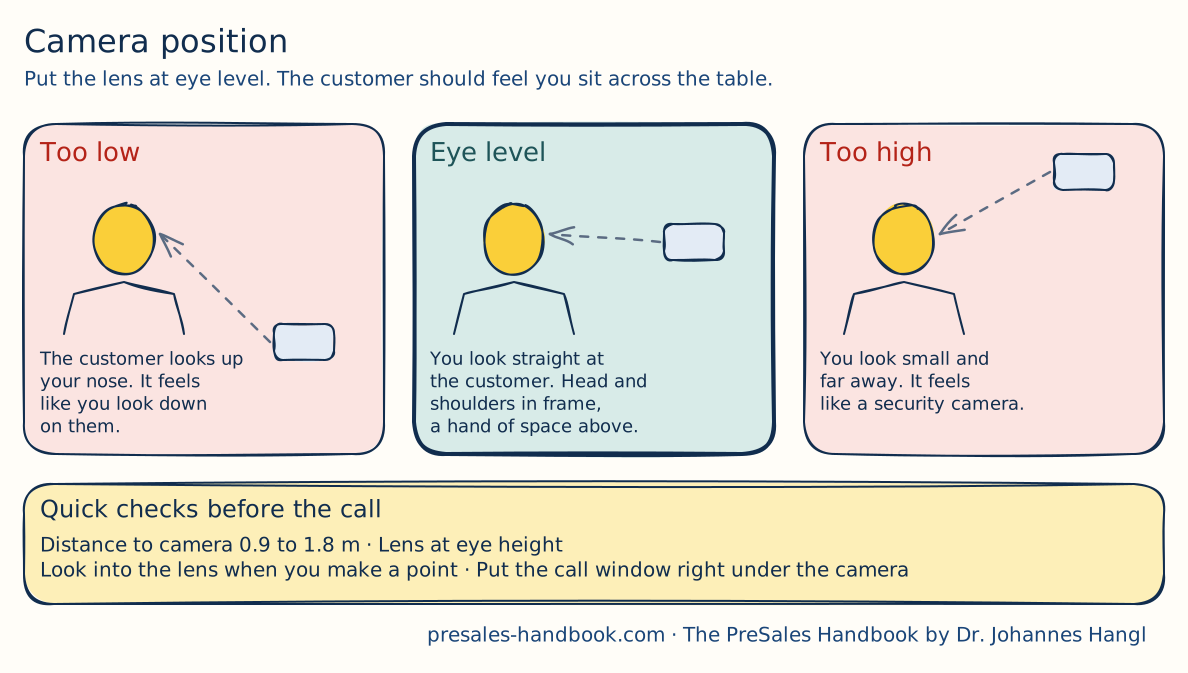
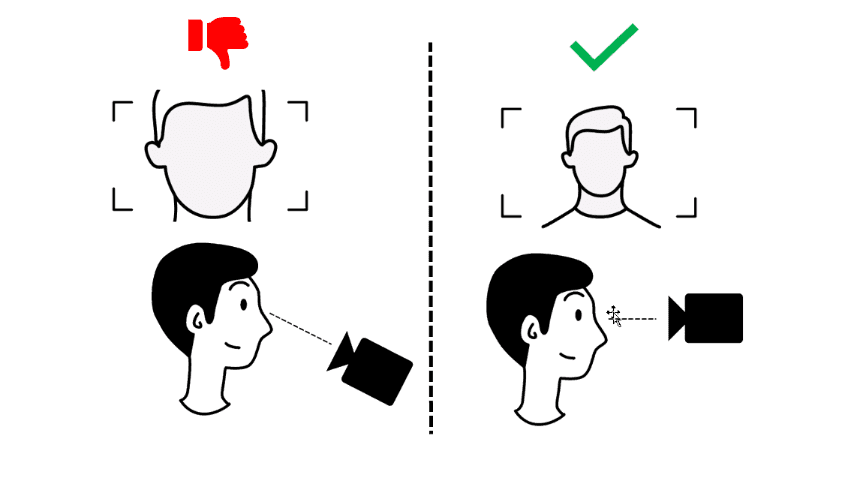
Eye level. Put the lens at the height of your eyes. From below, people look up at you, and that feels intimidating. From above, they look down on you, and you look small.
Framing. Sit in the middle of the frame. Show your head and shoulders, with a little space above your head.
Distance. Keep 0.9 to 1.8 meters (3 to 6 feet) between you and the camera. You can then use your hands without leaving the picture.
Tip: Move the call window right under the camera. You then look almost into the lens while you watch the customer.
Lighting
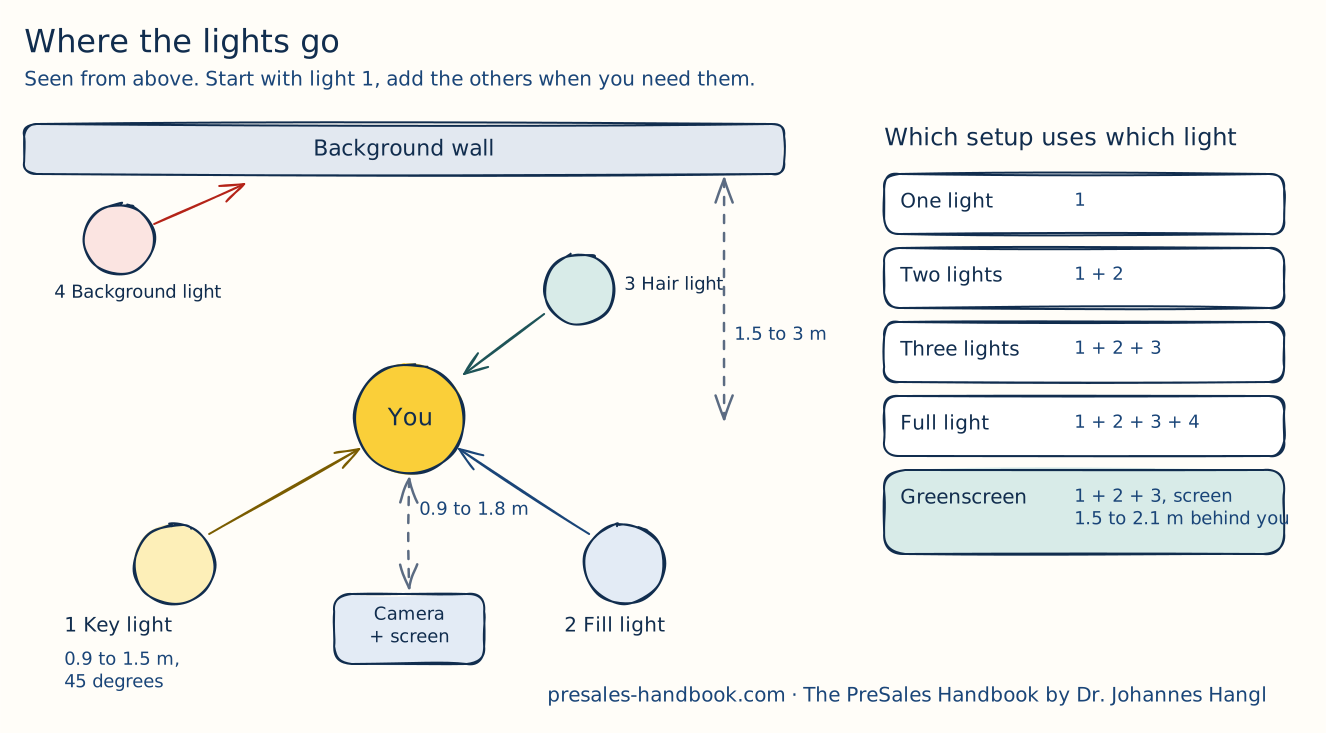
Light matters more than the camera. A cheap webcam with good light beats an expensive camera in a dark room. These are the four lights and what they do:
| Light | Job | Brightness | Where |
|---|---|---|---|
| 1 Key light | Main light on your face | 1,000 to 2,000 lumens | In front of you, 45 degrees to one side, 0.9 to 1.5 m away |
| 2 Fill light | Softens the shadows of the key light | 500 to 1,000 lumens | Other side, same angle, less bright |
| 3 Hair light | Separates you from the background | 500 to 1,000 lumens | Behind you, above your head, 0.9 to 1.2 m away |
| 4 Background light | Adds depth and a bit of mood to the wall | 500 to 1,000 lumens | Close to the wall, pointing up or down |
Three rules make any of these look good:
- Use diffusers. Put a softbox or diffuser on every light. Soft light means soft shadows.
- Match the colour temperature. Set all lights to the same value, around 5,500 K for a daylight look.
- Use the window, but face it. Daylight from the front is a great free key light. A window behind you turns you into a silhouette.
Audio
Customers forgive a soft picture. They do not forgive bad sound. A real microphone on an arm beats every built-in webcam or laptop mic. Earbuds or a headset stop the echo, so the customer does not hear themselves. I use Elgato gear from microphone to Stream Deck. You find the details on the hardware page (opens in a new tab).
Background
Keep it real. Virtual backgrounds can cost trust. People wonder what you hide, and your ears keep vanishing into the picture.
Keep it calm. A clean wall in white, grey or a soft colour works best. Add a few personal items, such as books, a plant or a picture. Just do not build a museum.
Give it depth. Put 1.5 to 3 meters (5 to 10 feet) between you and the wall. That gives you a natural separation.
Avoid shiny things. Glass, mirrors and glossy frames throw light back into the camera. Choose matte surfaces.
Branding is optional. A subtle logo or brand colour can work. Keep it small.
Technology
Internet. Use a cable if you can. Wi-Fi drops always pick the moment of your best demo.
Computer and screens. You need a fast computer and two screens or one ultrawide. My own setup is on the hardware page (opens in a new tab).
Backups. Back up your files to the cloud or an external drive. Losing a demo environment the night before a pitch is not fun.
Organisation
A room with a door. Pick a quiet place with little traffic. A separate room is ideal, a well defined corner also works. Keep the bedroom out of it.
A clear desk. Keep only what you need within reach. Use trays and cable organisers. Tidy cables are also a safety topic.
Comfort. A good chair, a desk at the right height and fresh air keep you going. Water and a healthy snack in reach help in long call days.
Breaks. Leave the room for breaks. Your head needs to know when work ends.
Choose Your Lighting Setup
These are the five setups I recommend, from simple to studio. Pick the one that fits how you work. You can always grow into the next one.
| Setup | Lights | Who it's for | Budget | Effort | Details |
|---|---|---|---|---|---|
| One light | Key | Your first real setup. Daily calls, small budget | € | 15 minutes | One light |
| Two lights | Key and fill | You demo a lot and want even light without hard shadows | €€ | 30 minutes | Two lights |
| Three lights | Key, fill and hair | You record videos or host webinars and want to stand out from the background | €€€ | An afternoon | Three lights |
| Full light | Key, fill, hair and background | You create content and want a studio look | €€€€ | A weekend | Full light |
| Greenscreen | Key, fill, hair and a green screen | You swap backgrounds for recordings or virtual events | €€€ | A weekend plus practice | Greenscreen |
The Base Kit for Every Setup
Every setup starts with the same five things. The per-setup lists below only add what is new.
Some links on this page are Amazon affiliate links. As an Amazon Associate I earn from qualifying purchases. It costs you nothing extra.
Setup with One Light
Who it's for: everyone who starts. One good key light already beats most of what customers see in their calls.
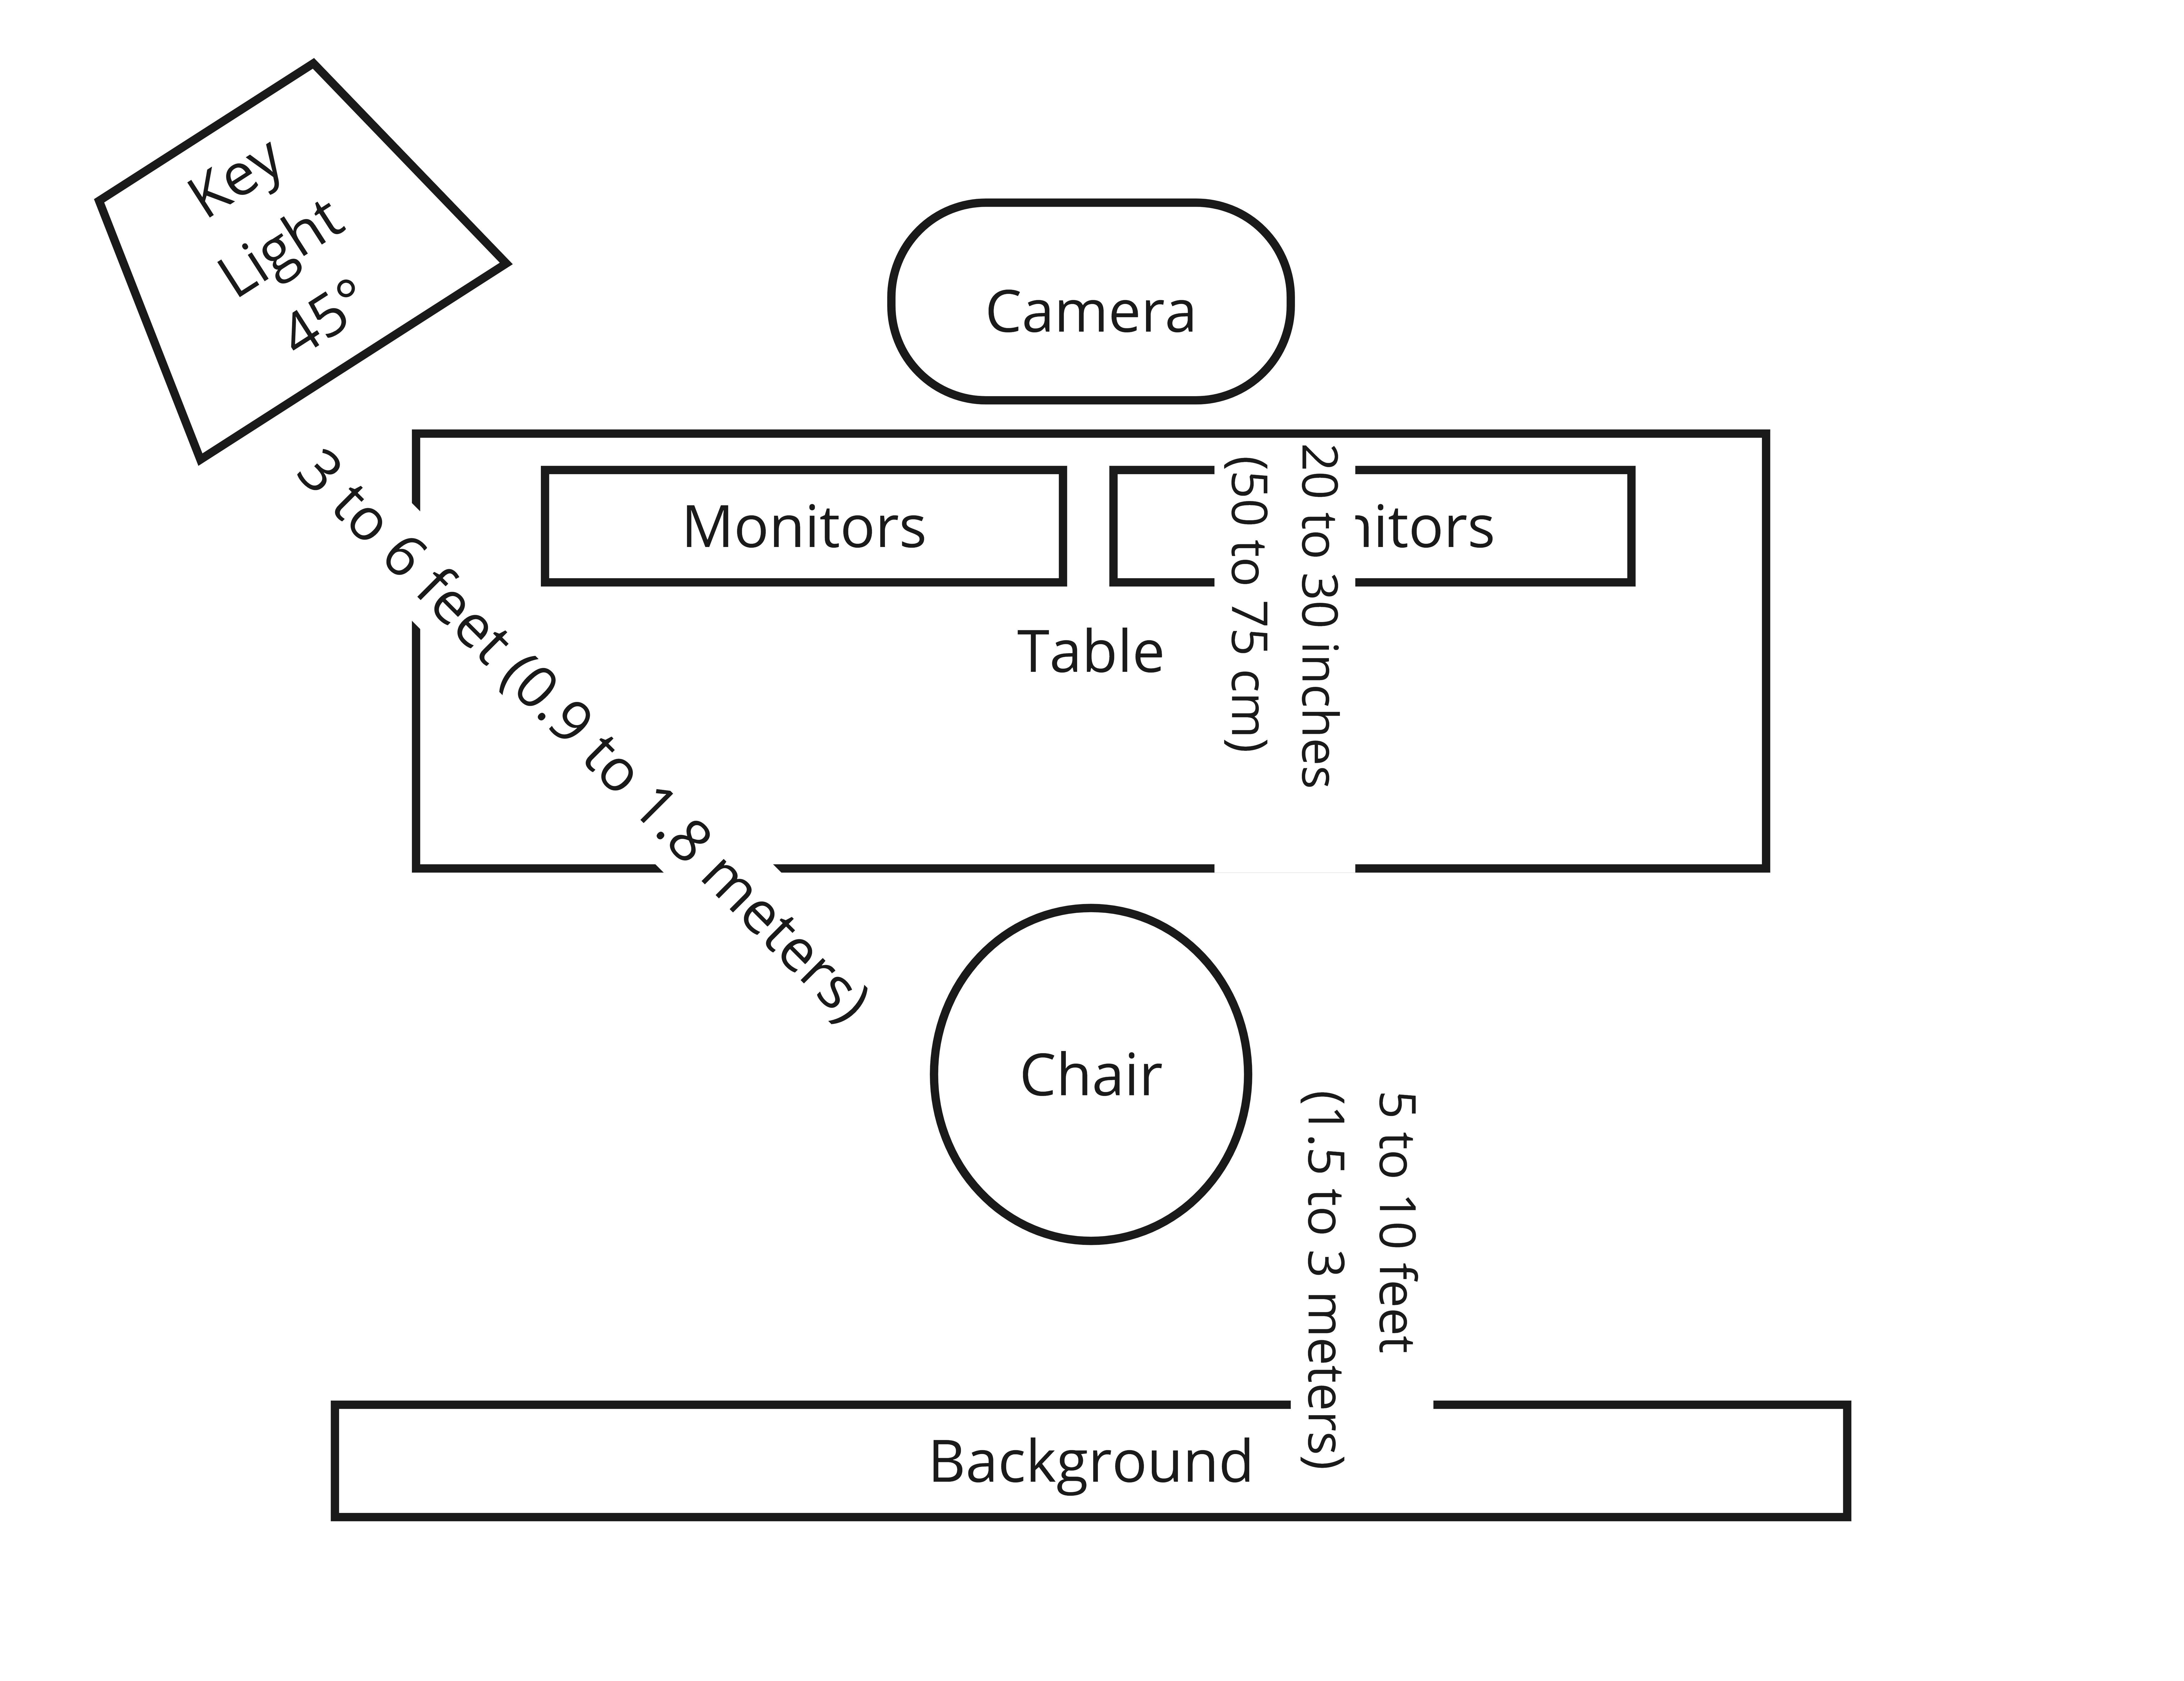
| From your chair to | Distance | Why |
|---|---|---|
| Camera | 0.9 to 1.8 m (3 to 6 ft) | A clear head and shoulders shot |
| Key light | 0.9 to 1.5 m (3 to 5 ft), 45 degrees to one side | Gives your face depth |
| Background | 1.5 to 3 m (5 to 10 ft) | Separates you from the wall |
What it looks like:
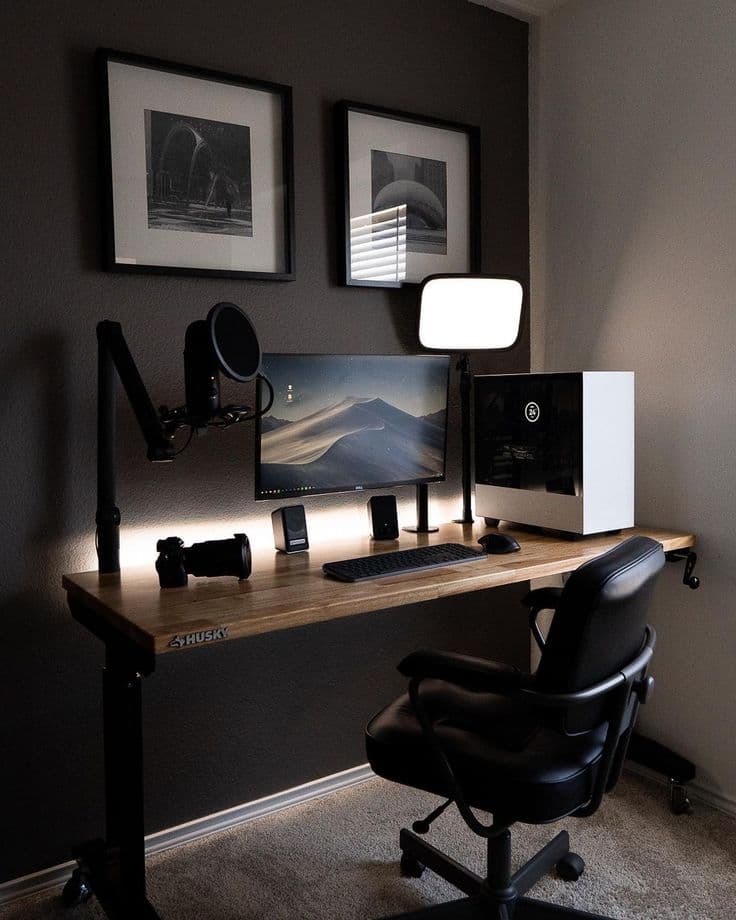
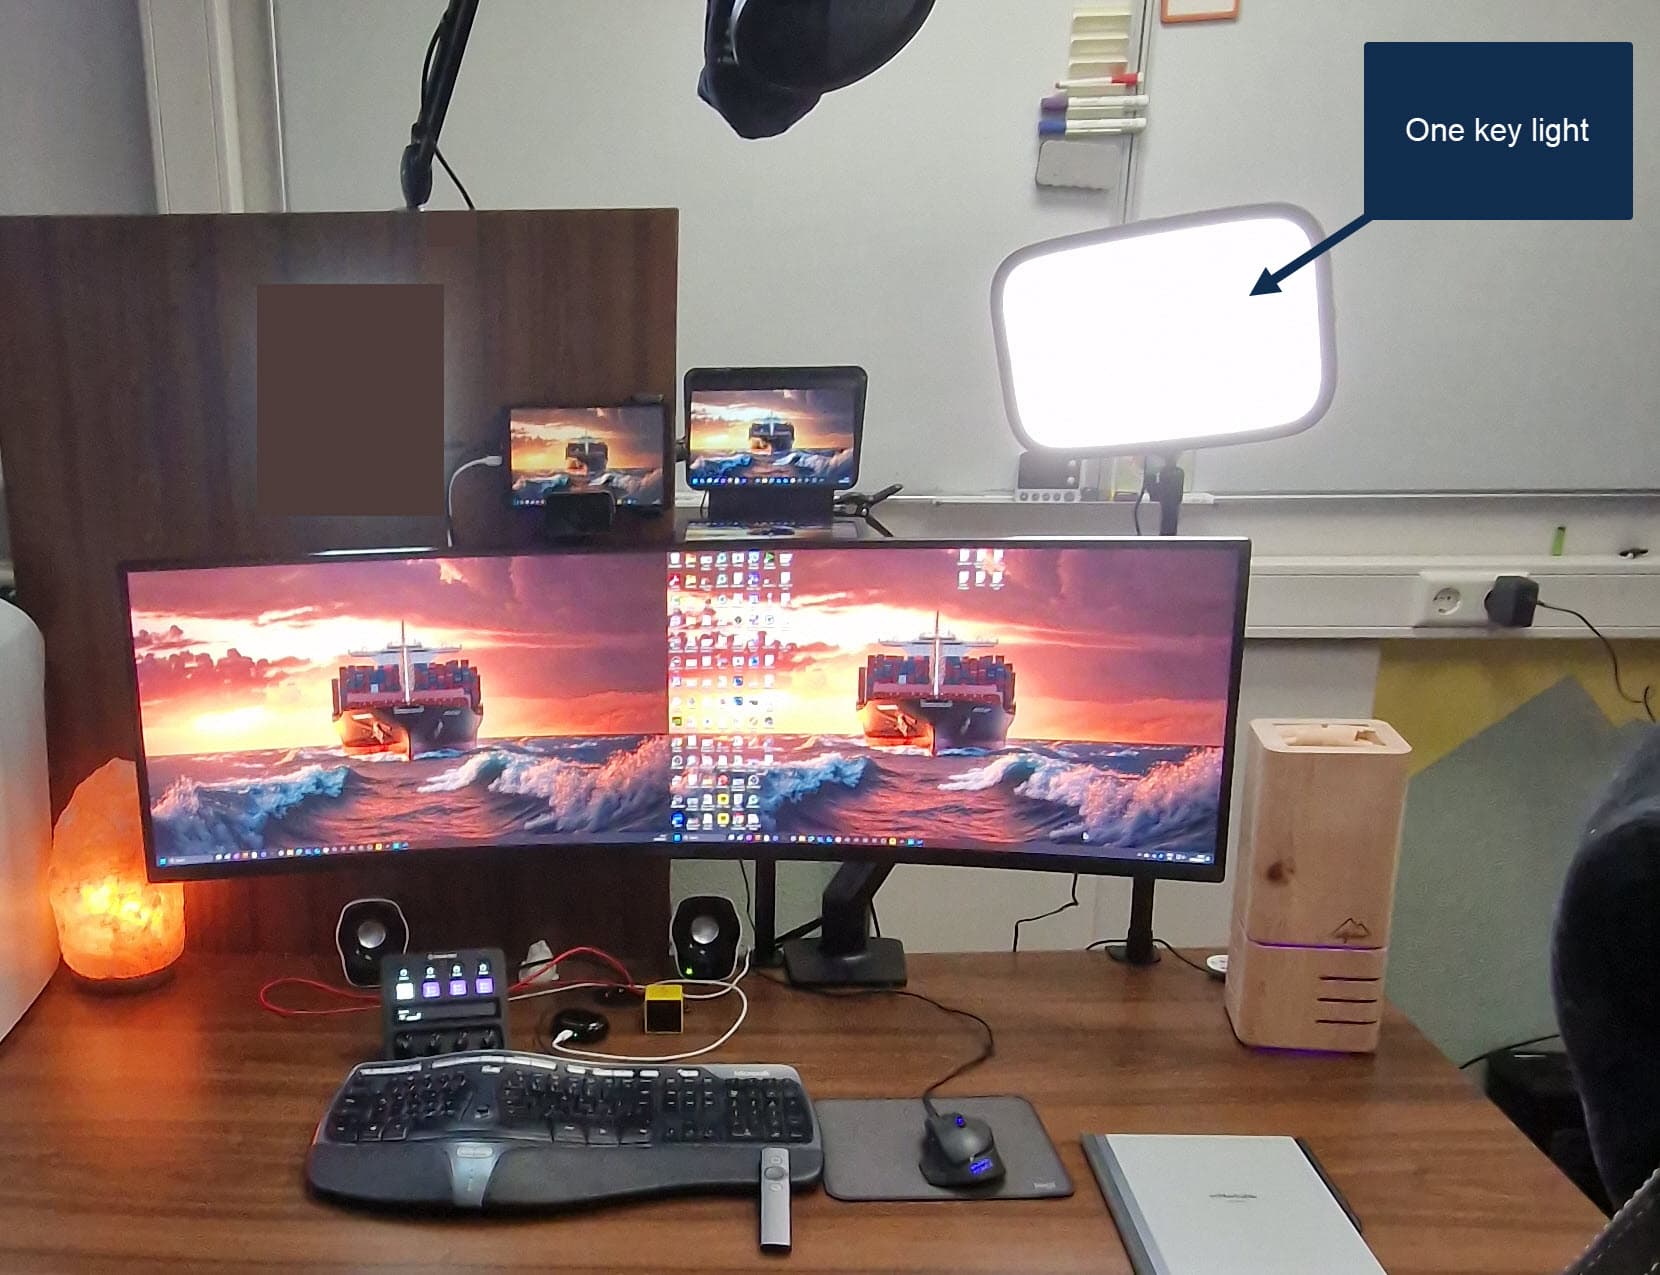
What you need: the base kit. Nothing more.
Setup with Two Lights
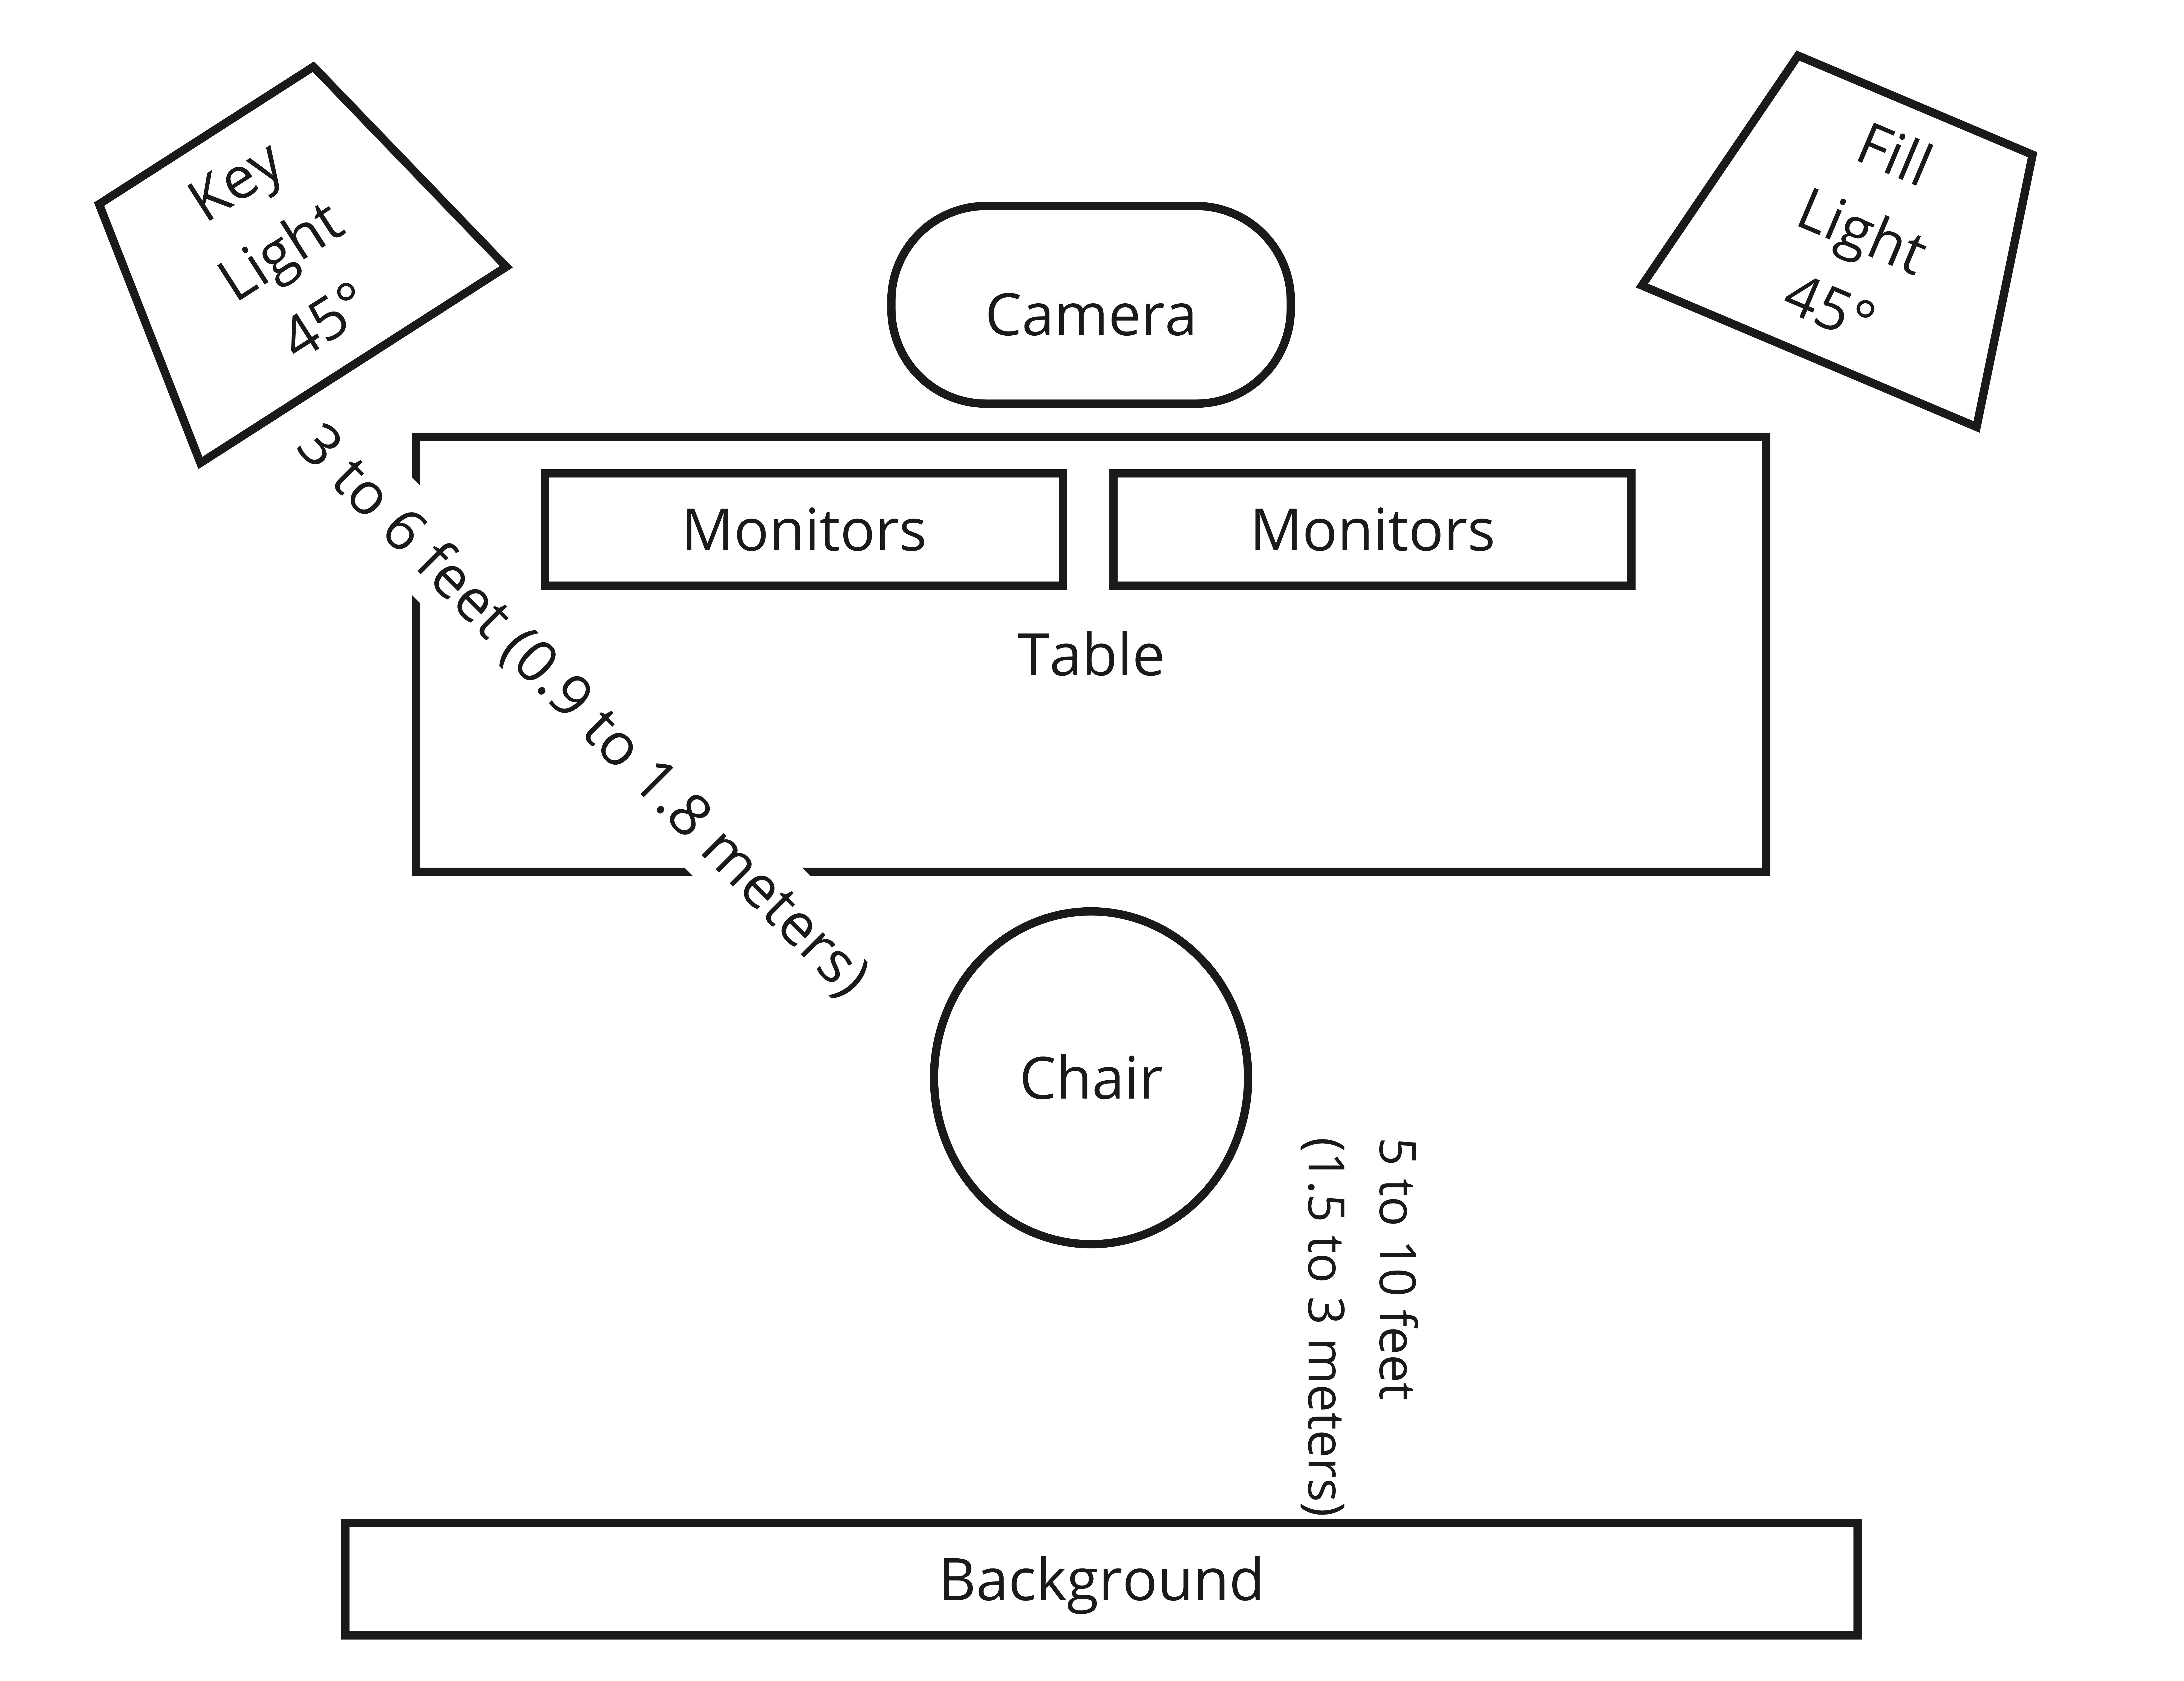
Who it's for: you demo often and want soft, even light. The fill light removes the hard shadow on one side of your face.
| From your chair to | Distance | Why |
|---|---|---|
| Camera | 0.9 to 1.8 m (3 to 6 ft) | A clear head and shoulders shot |
| Key light | 0.9 to 1.5 m (3 to 5 ft), 45 degrees to one side | Gives your face depth |
| Fill light | 0.9 to 1.5 m (3 to 5 ft), 45 degrees to the other side | Softens the shadows |
| Background | 1.5 to 3 m (5 to 10 ft) | Separates you from the wall |
What it looks like:
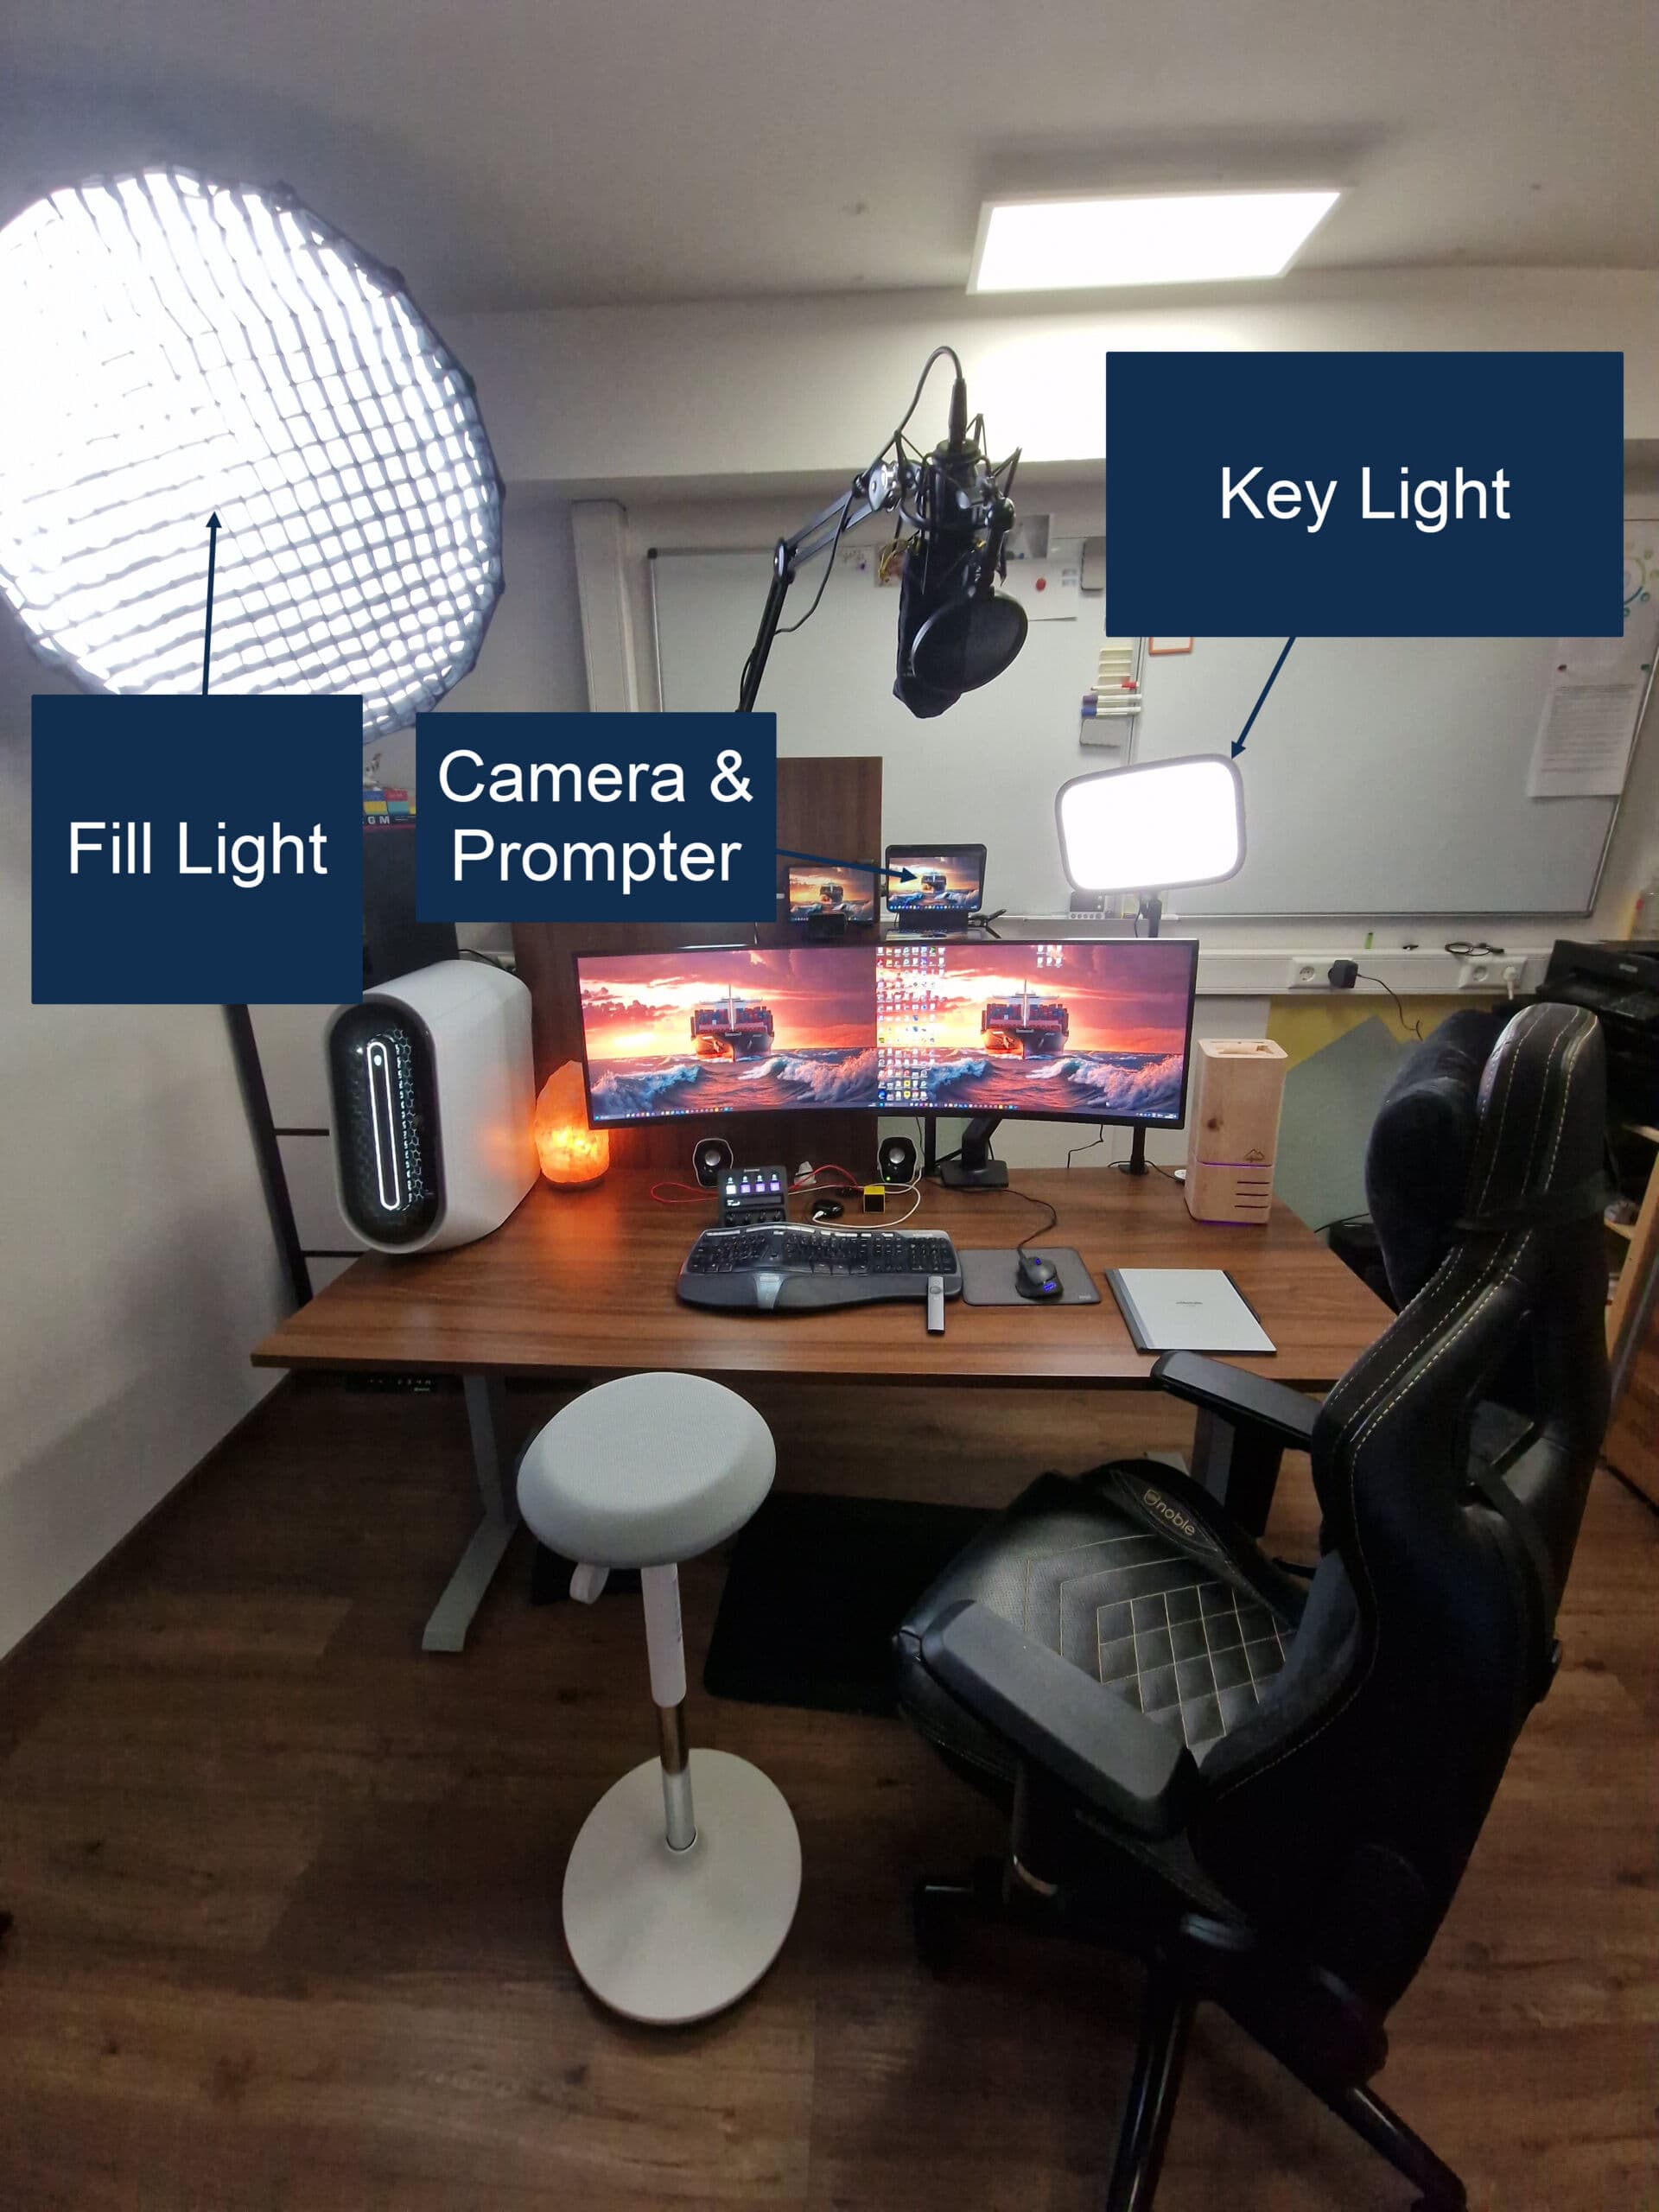
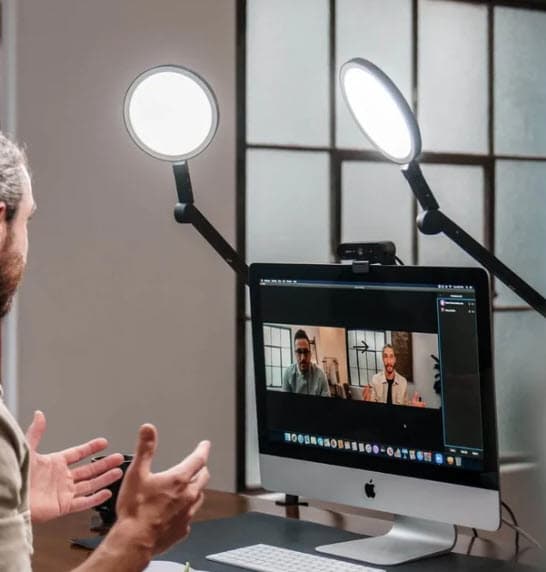
What you need: the base kit, plus:
| Type | Low cost | High quality |
|---|---|---|
| Fill light | Elgato Key Light (opens in a new tab) | Aputure Amaran 200d S (opens in a new tab) with the Light Dome SE 85 cm (opens in a new tab) or the Light Dome Mini SE 58 cm (opens in a new tab) |
Setup with Three Lights
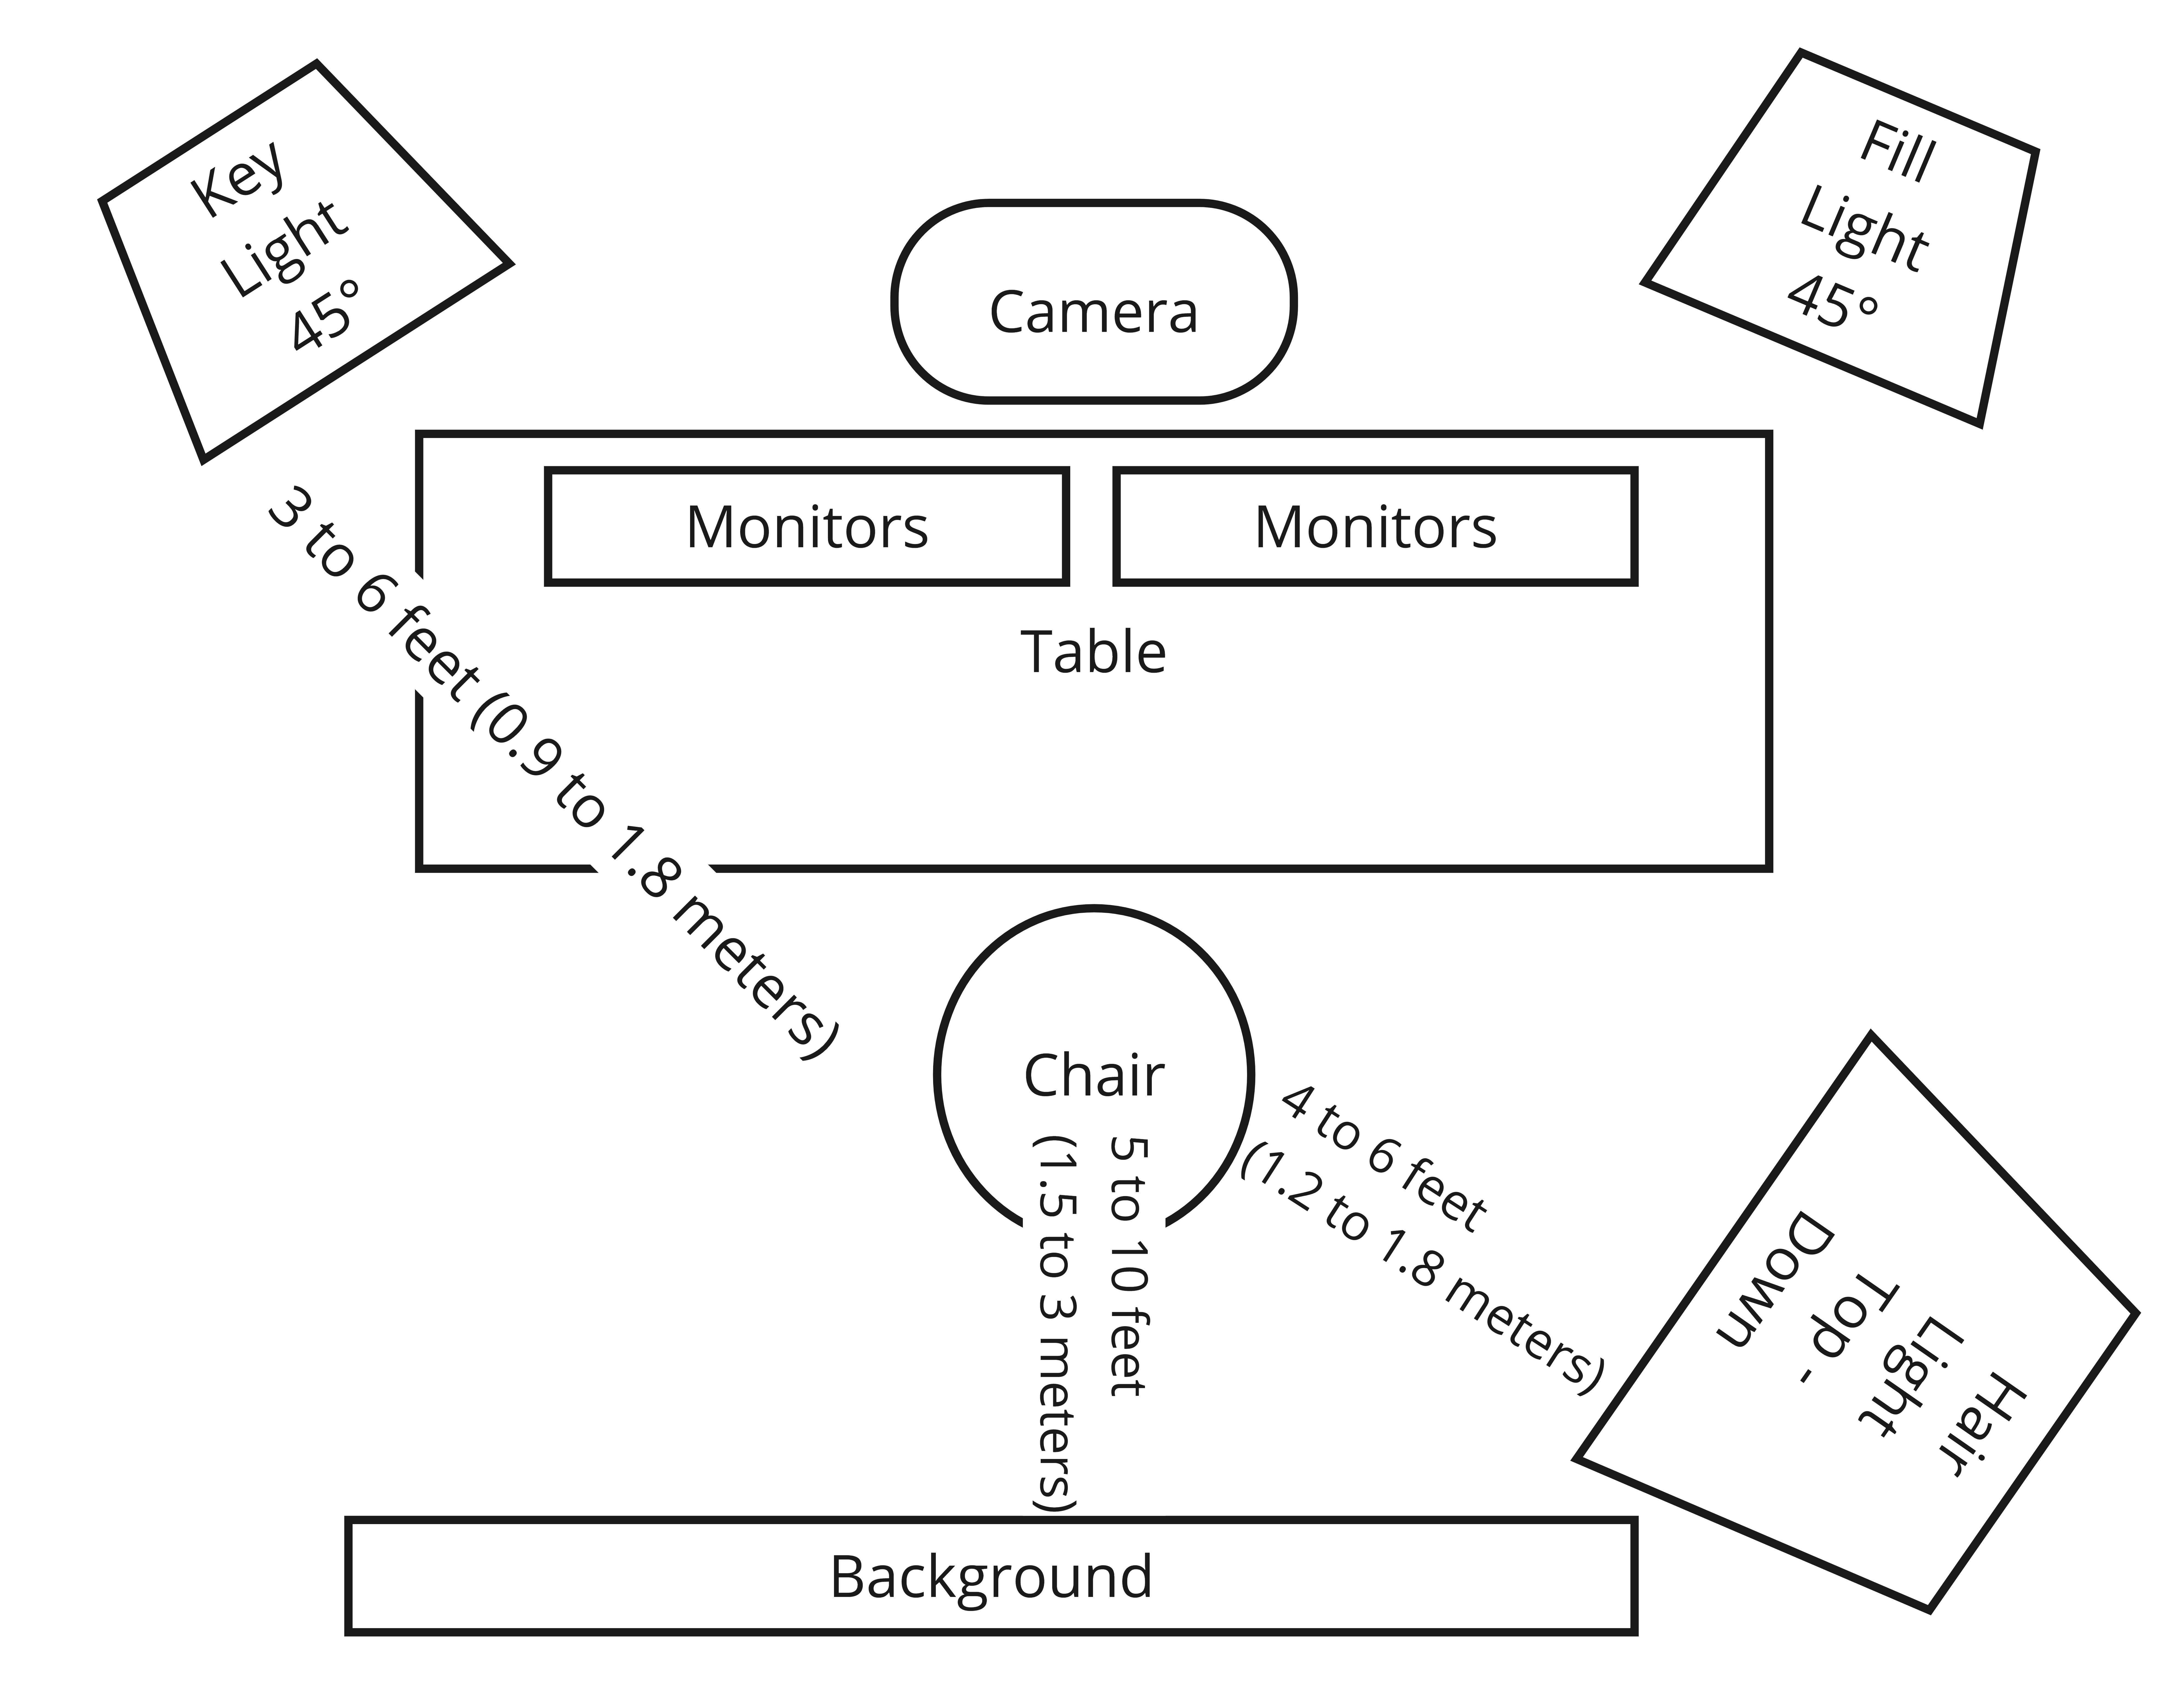
Who it's for: you record videos or host webinars. The hair light draws a thin line of light around your head and shoulders. You pop out of the background.
| From your chair to | Distance | Why |
|---|---|---|
| Camera | 0.9 to 1.8 m (3 to 6 ft) | A clear head and shoulders shot |
| Key light | 0.9 to 1.5 m (3 to 5 ft), 45 degrees to one side | Gives your face depth |
| Fill light | 0.9 to 1.5 m (3 to 5 ft), 45 degrees to the other side | Softens the shadows |
| Hair light | 0.9 to 1.2 m (3 to 4 ft), above and slightly behind you | Separates you from the background |
| Background | 1.5 to 3 m (5 to 10 ft) | Separates you from the wall |
What it looks like:
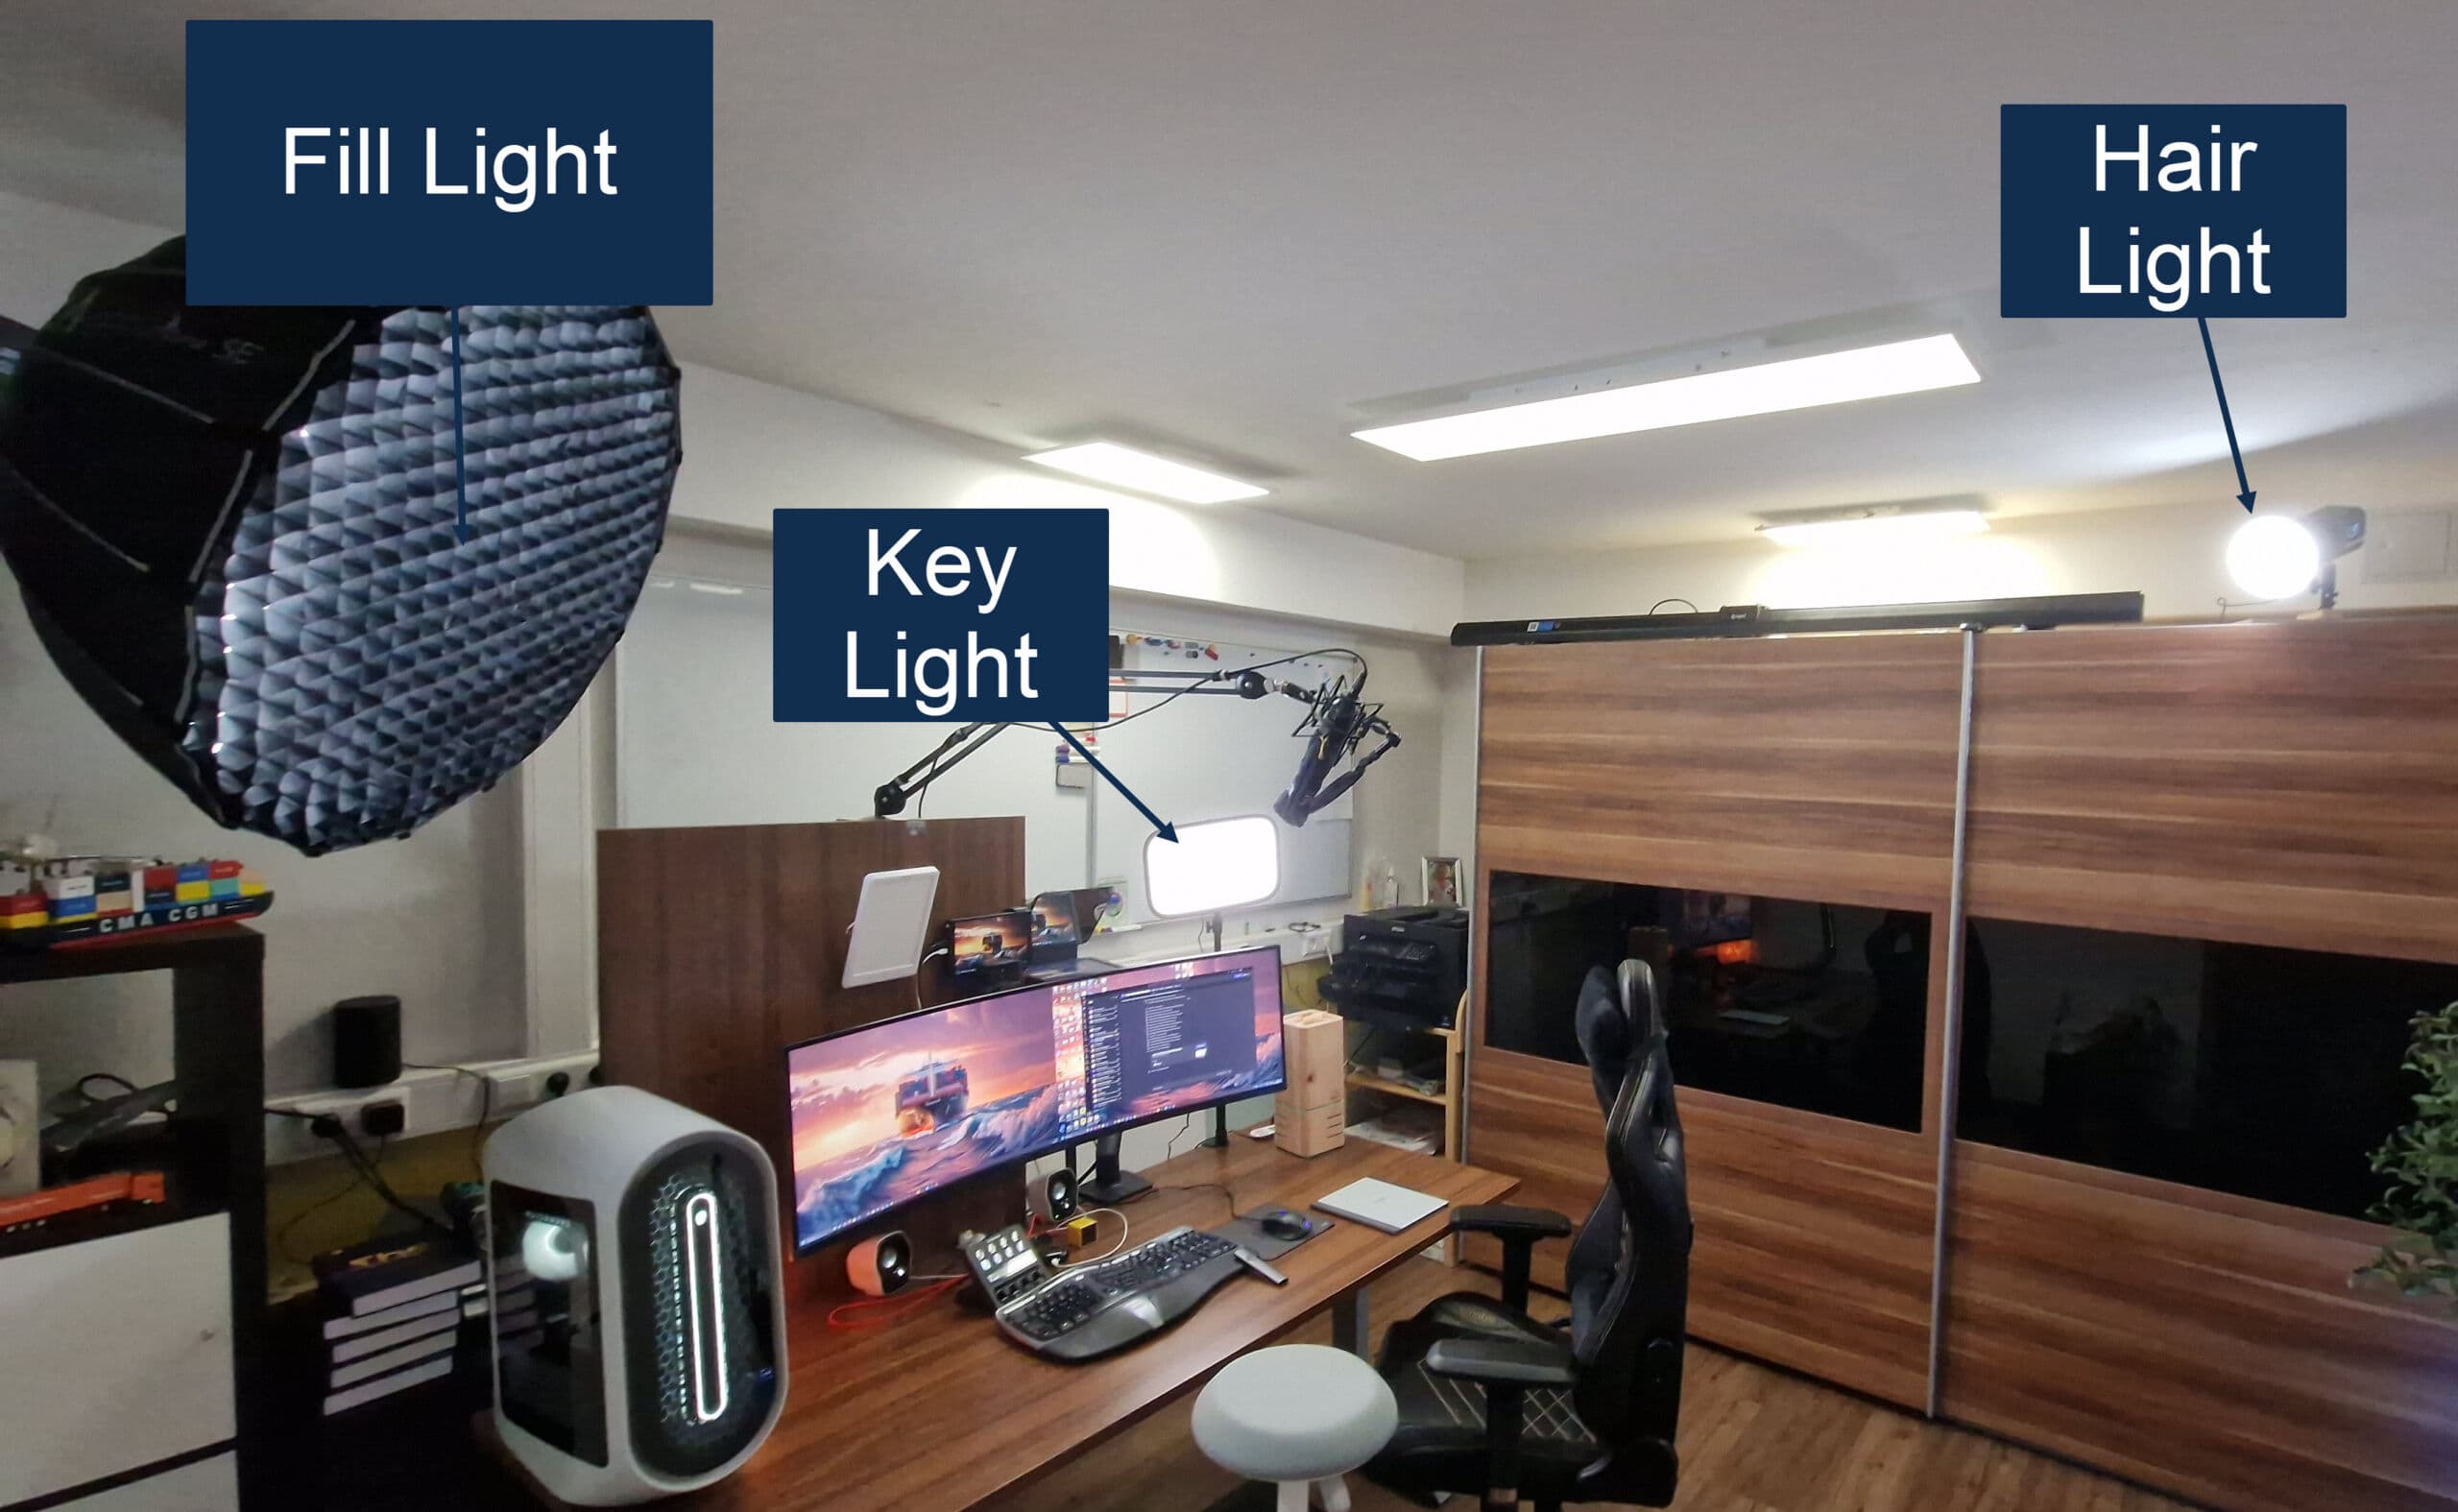
What you need: the base kit, plus:
| Type | Low cost | High quality |
|---|---|---|
| Fill light | Elgato Key Light (opens in a new tab) | Aputure Amaran 200d S (opens in a new tab) with the Light Dome SE 85 cm (opens in a new tab) or the Light Dome Mini SE 58 cm (opens in a new tab) |
| Hair light | Amaran 60x S (opens in a new tab) |
Setup with Full Lights
Who it's for: you create content, run webinars or just love a studio look. The background light adds depth and a bit of mood to the wall.
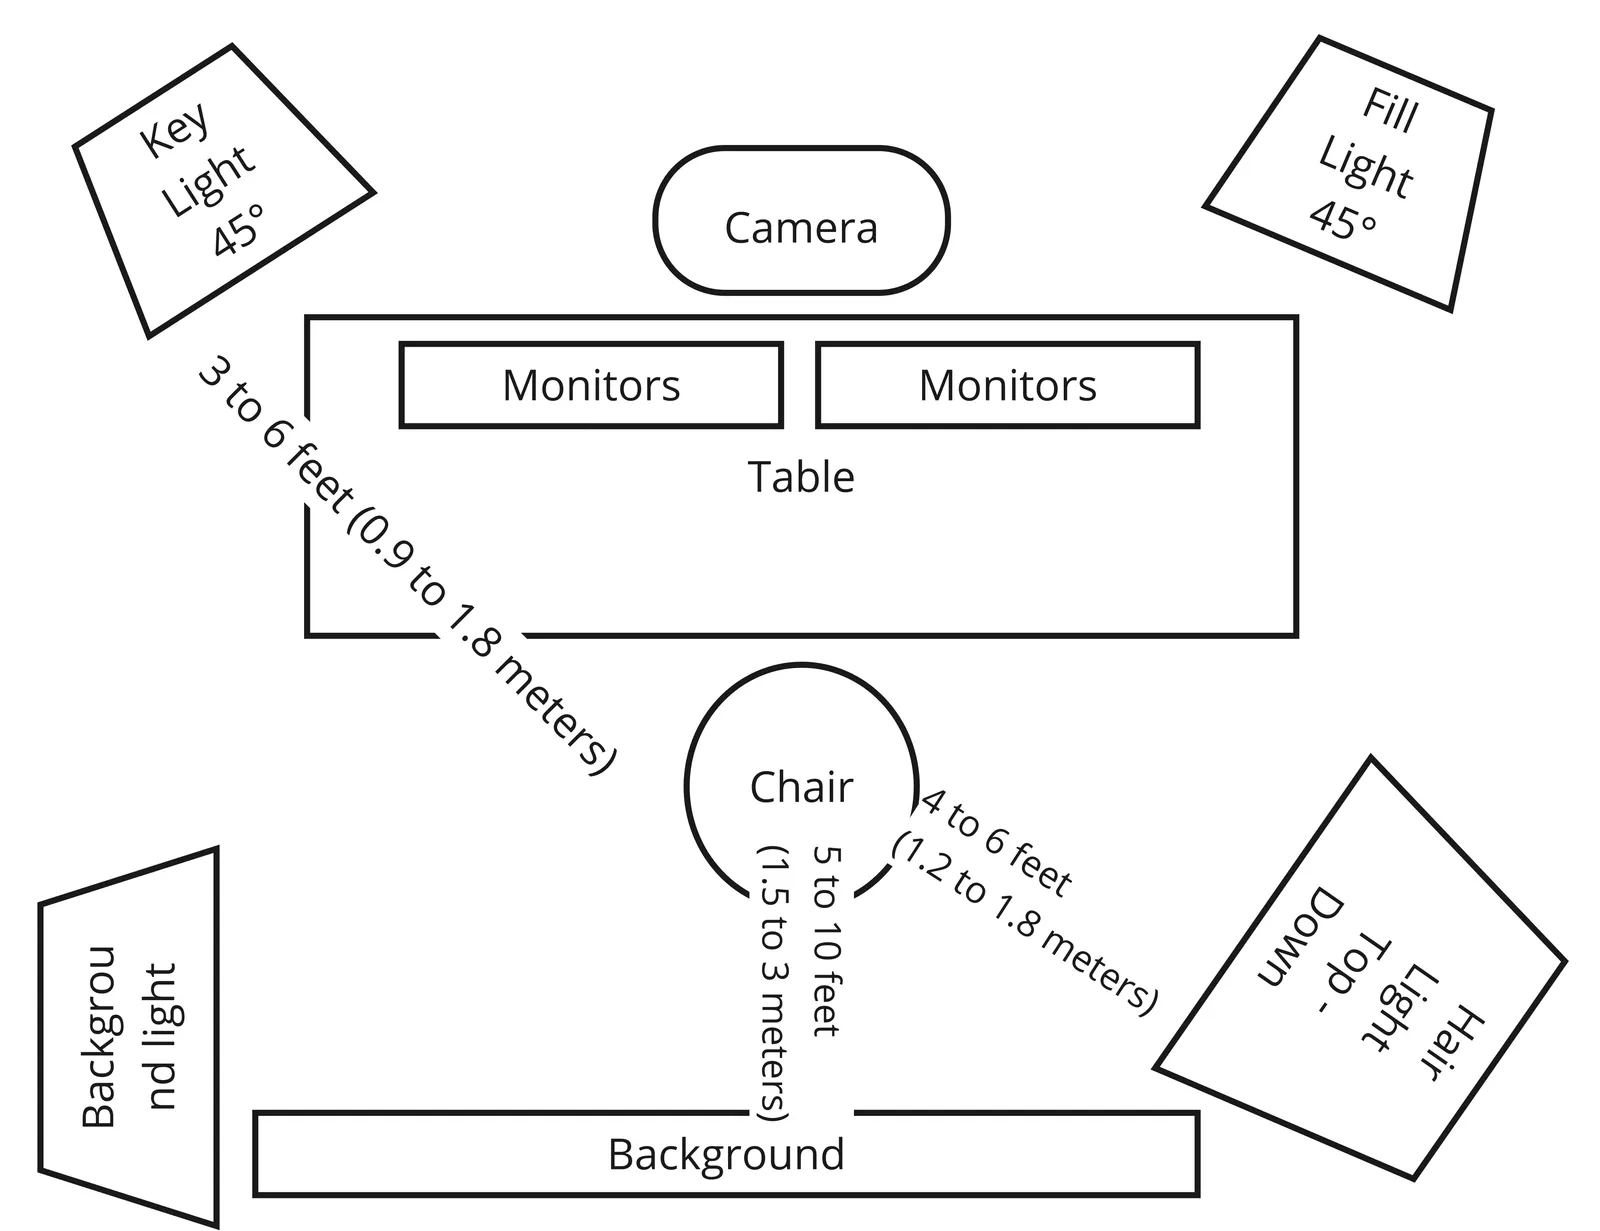
| From your chair to | Distance | Why |
|---|---|---|
| Camera | 0.9 to 1.8 m (3 to 6 ft) | A clear head and shoulders shot |
| Key light | 0.9 to 1.5 m (3 to 5 ft), 45 degrees to one side | Gives your face depth |
| Fill light | 0.9 to 1.5 m (3 to 5 ft), 45 degrees to the other side | Softens the shadows |
| Hair light | 0.9 to 1.2 m (3 to 4 ft), above and slightly behind you | Separates you from the background |
| Background | 1.5 to 3 m (5 to 10 ft) | Separates you from the wall |
| Background light to wall | 0.9 to 2.1 m (3 to 7 ft) | Lights the wall, not you |
What it looks like:
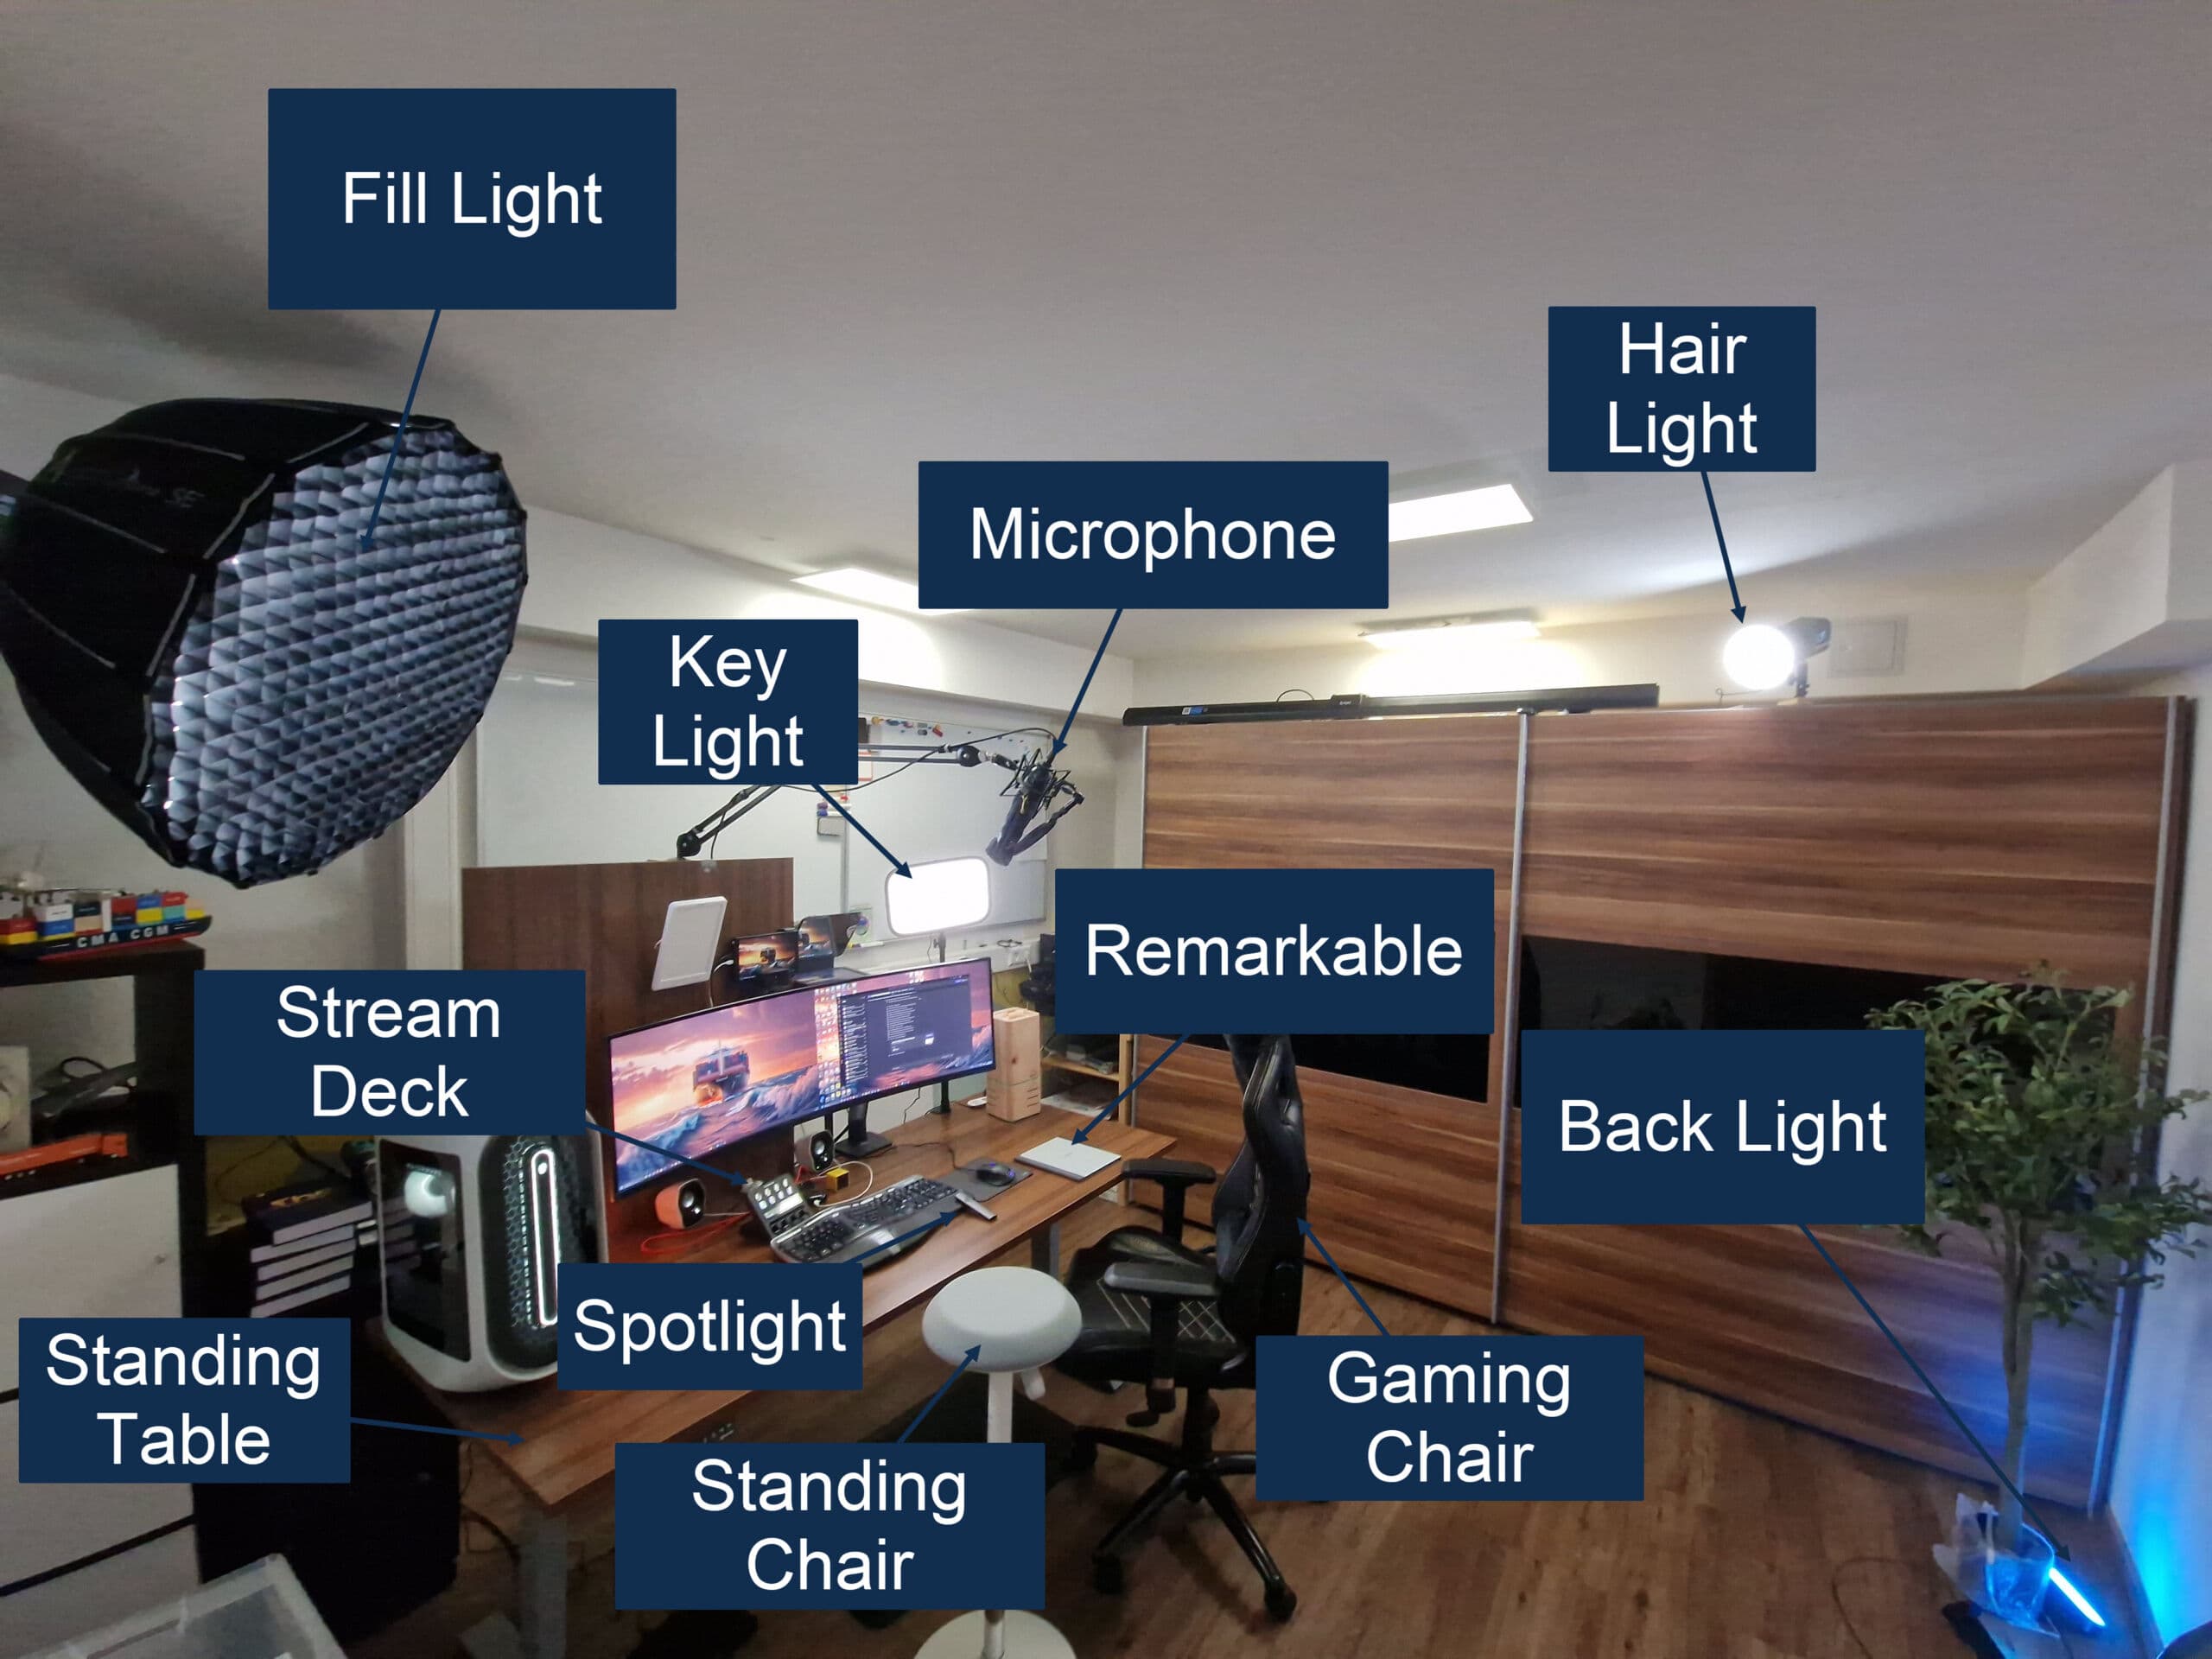
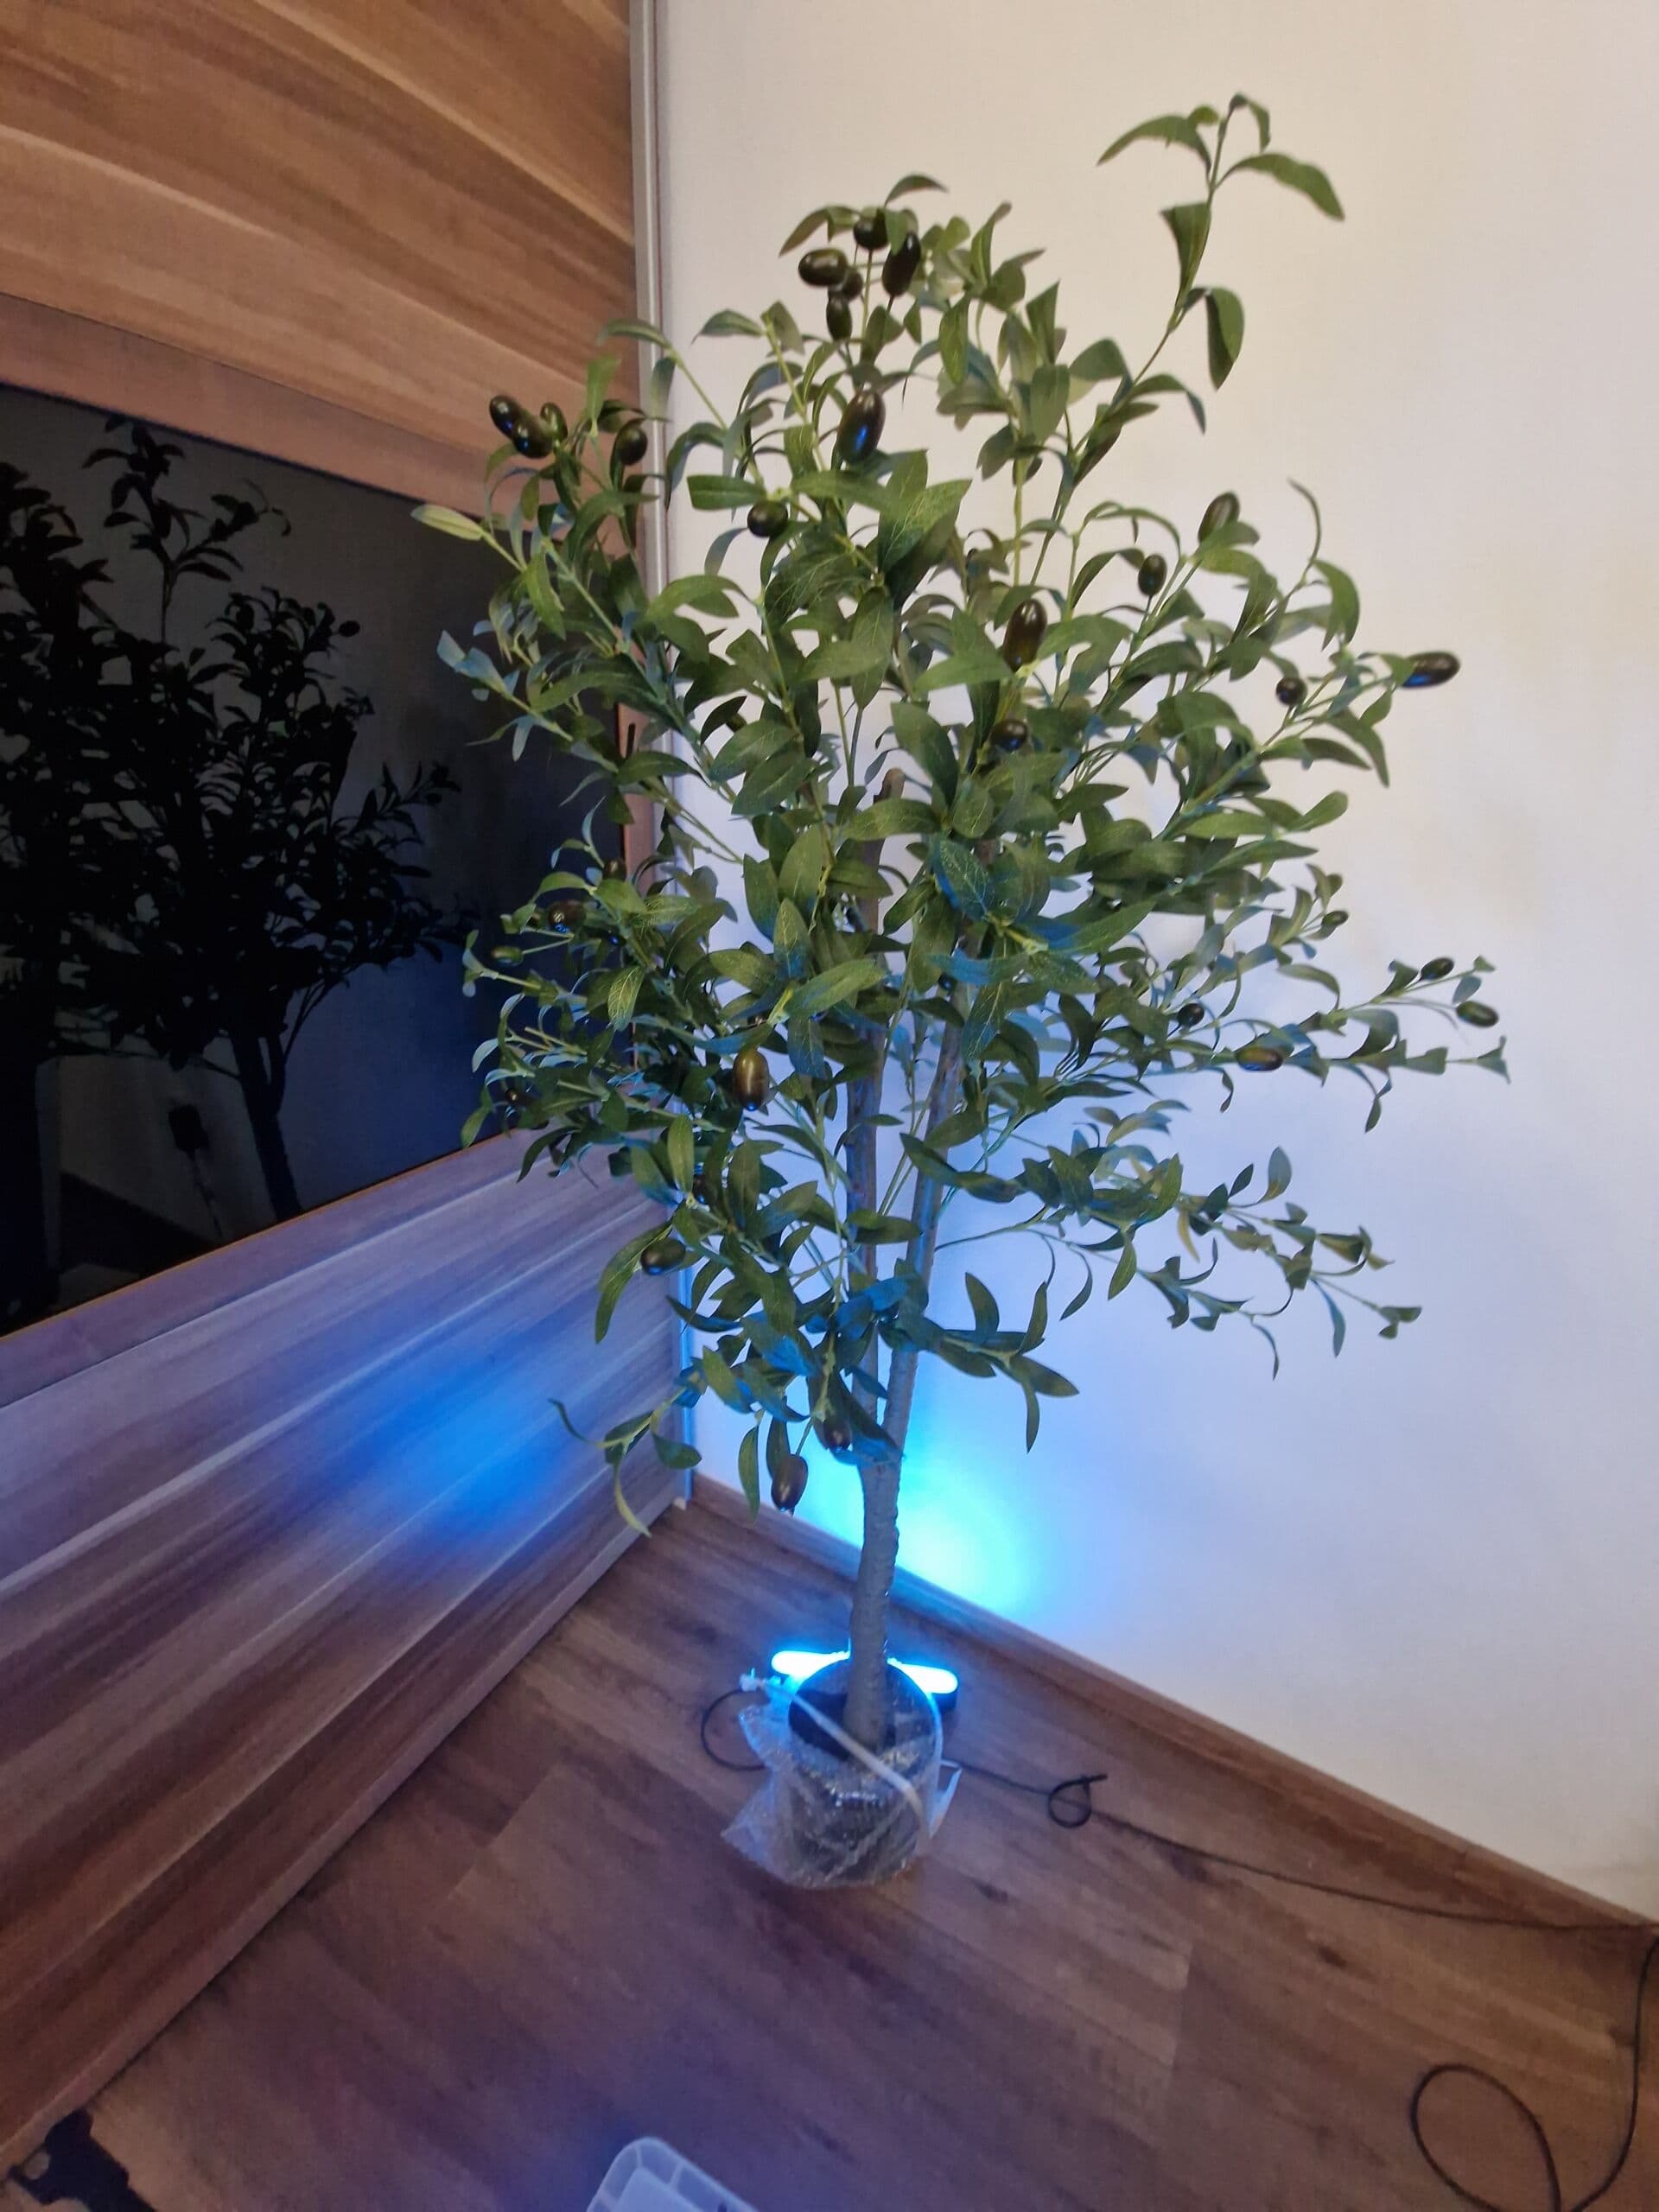
How to use the background light:
- Placement. Put it low and point it up, or mount it high and point it down. Try both. Low angles make interesting shadows.
- Type. Spotlights highlight one object, like a shelf or a plant. Wash lights light the whole wall evenly. Coloured light sets a mood, so use it with care.
- Balance. The wall should never be brighter than your face. If it is, turn it down.
- No spill. Keep the background light off your face and body. It creates odd shadows and glare.
- Same colour temperature. Match it to your key and fill light, unless you want a coloured accent on purpose.
What you need: the base kit, plus:
| Type | Low cost | High quality |
|---|---|---|
| Fill light | Elgato Key Light (opens in a new tab) | Aputure Amaran 200d S (opens in a new tab) with the Light Dome SE 85 cm (opens in a new tab) or the Light Dome Mini SE 58 cm (opens in a new tab) |
| Hair light | Amaran 60x S (opens in a new tab) | |
| Background light | Philips Hue White and Color (opens in a new tab) | Aputure Amaran (opens in a new tab) |
| Backdrop | Voodrop background (opens in a new tab) |
Setup with Greenscreen
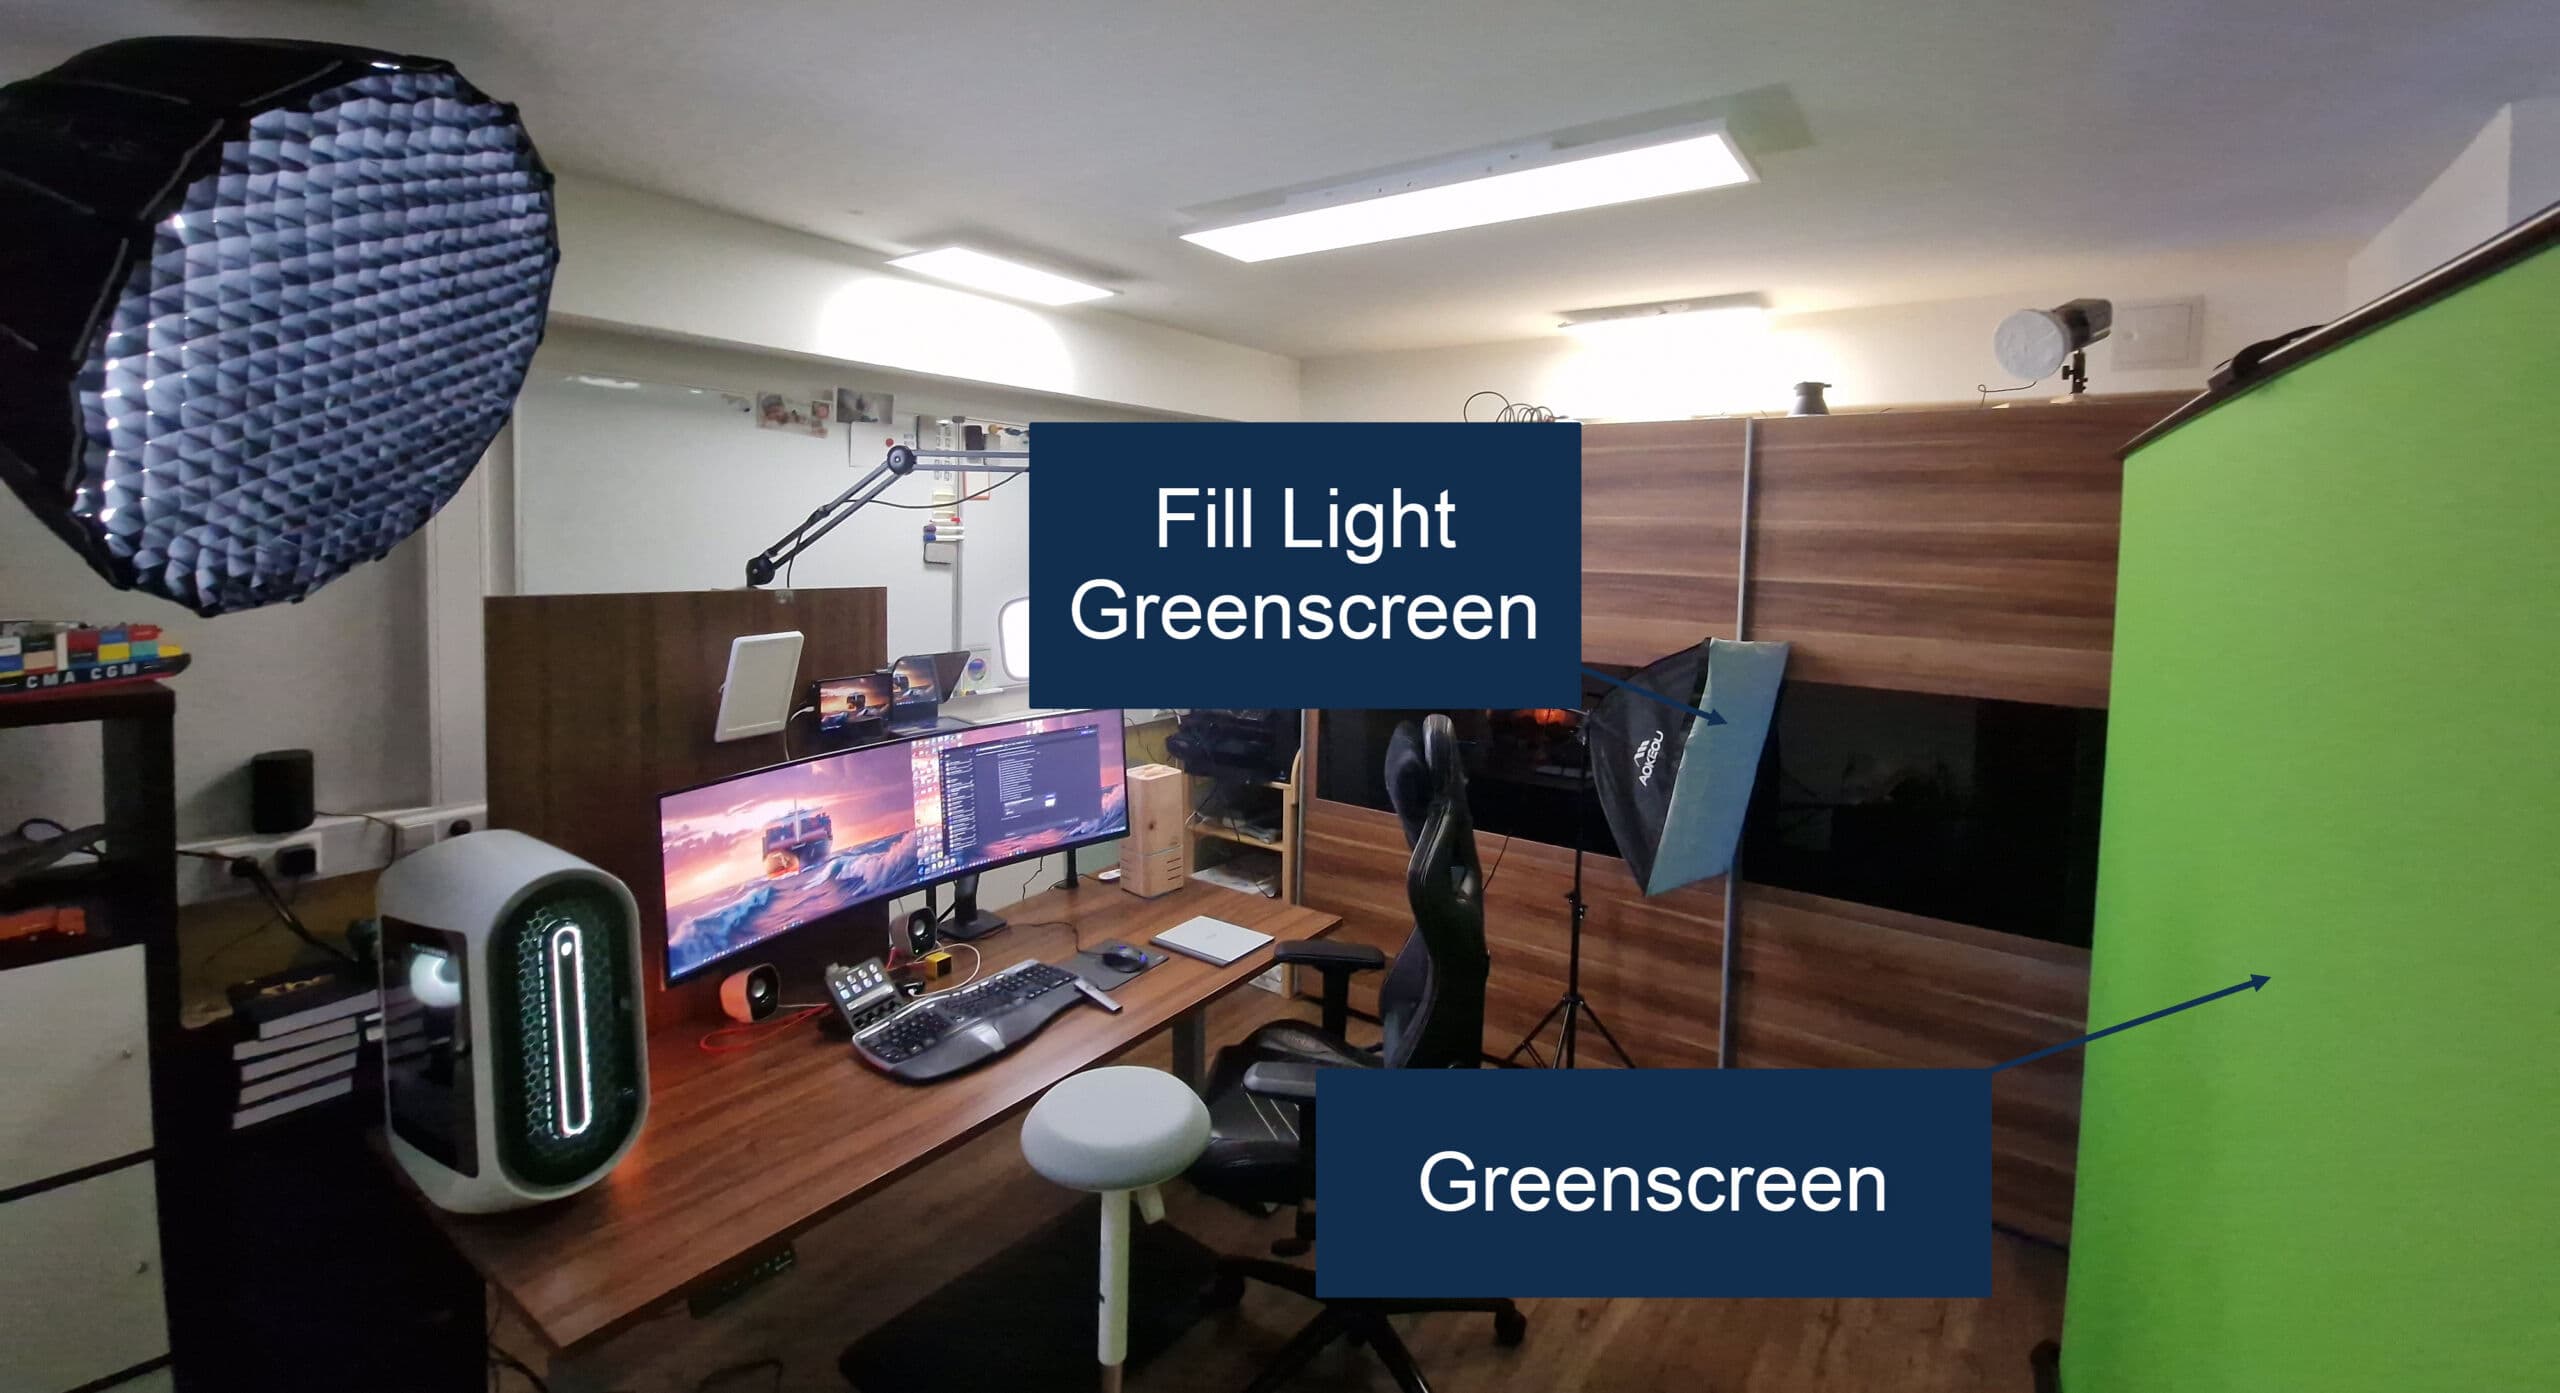
Who it's for: you record videos and want to swap the background, or you speak at virtual events. It takes the most effort. The light on the screen has to be even, or the software cuts off your hair.
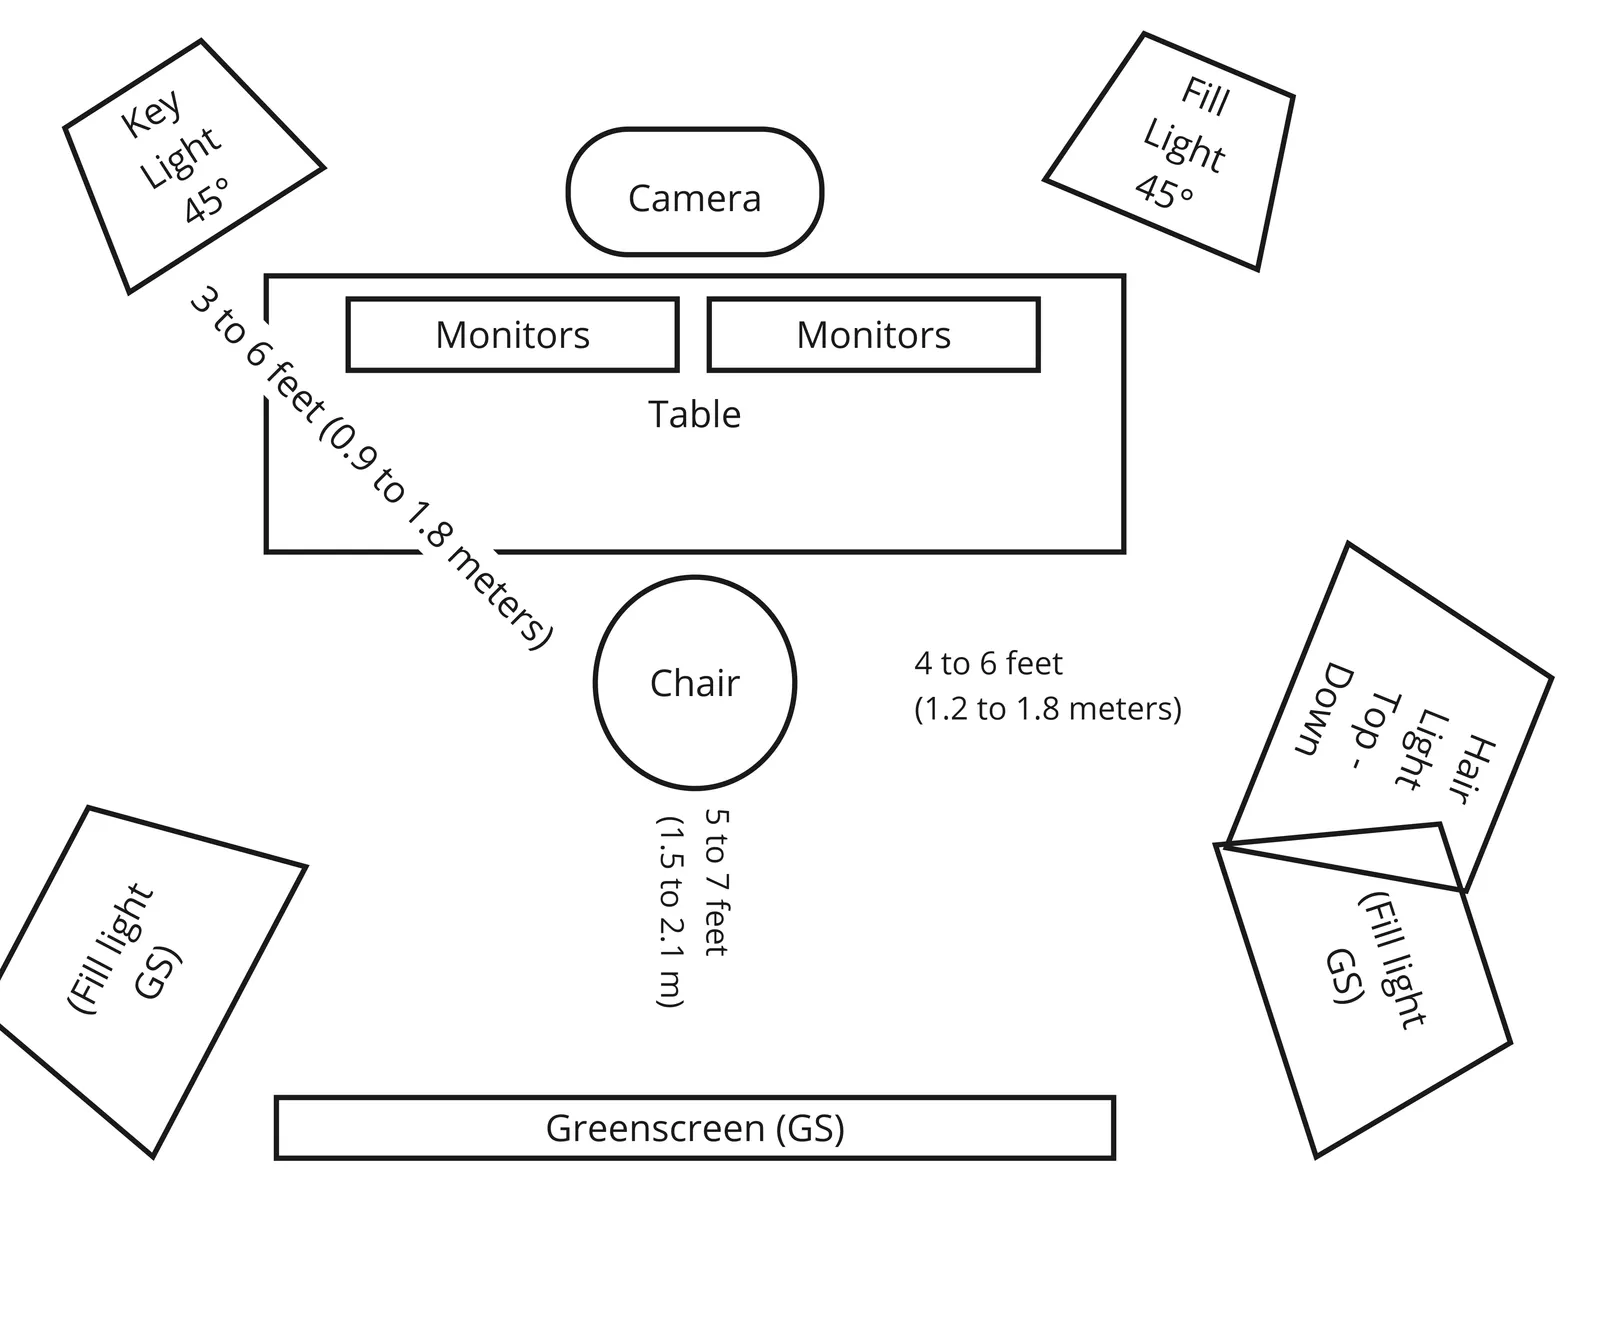
| From your chair to | Distance | Why |
|---|---|---|
| Camera | 0.9 to 1.8 m (3 to 6 ft) | A clear head and shoulders shot |
| Key light | 0.9 to 1.5 m (3 to 5 ft), 45 degrees to one side | Gives your face depth |
| Fill light | 0.9 to 1.5 m (3 to 5 ft), 45 degrees to the other side | Softens the shadows |
| Hair light | 0.9 to 1.2 m (3 to 4 ft), above and slightly behind you | Separates you from the screen |
| Greenscreen | 1.5 to 2.1 m (5 to 7 ft) | No shadows on the screen, a clean cut-out |
What it looks like:
What you need: the base kit, plus:
| Type | Low cost | High quality |
|---|---|---|
| Fill light | Elgato Key Light (opens in a new tab) | Aputure Amaran 200d S (opens in a new tab) with the Light Dome SE 85 cm (opens in a new tab) or the Light Dome Mini SE 58 cm (opens in a new tab) |
| Hair light | Amaran 60x S (opens in a new tab) | |
| Light for the screen | GEEKOTO softbox set (opens in a new tab) | Amaran 200d S (opens in a new tab) |
| Greenscreen | EMART green screen 1.8 x 2.8 m (opens in a new tab) | Elgato Green Screen XL (opens in a new tab) |
Set It Up Step by Step
- Pick the place. Quiet, away from traffic, ideally with a window you can face. Check that desk, chair and lights fit.
- Furnish it. A desk big enough for computer and screens. A chair with good lumbar support. Shelves or drawers for the rest.
- Clear the desk. Keep the essentials in reach. Tidy the cables. Set up one filing system, on paper and digital.
- Connect the tech. Computer, keyboard, mouse, screens. Internet by cable. Backups on.
- Place the camera. Eye level, 0.9 to 1.8 m away, call window right under it.
- Add light. Start with the key light at 45 degrees. Add the others from the comparison when you need them.
- Set the background. Real, calm, with depth. Nothing that shines.
- Test with a friend. Do a short call and ask for honest feedback on picture and sound.
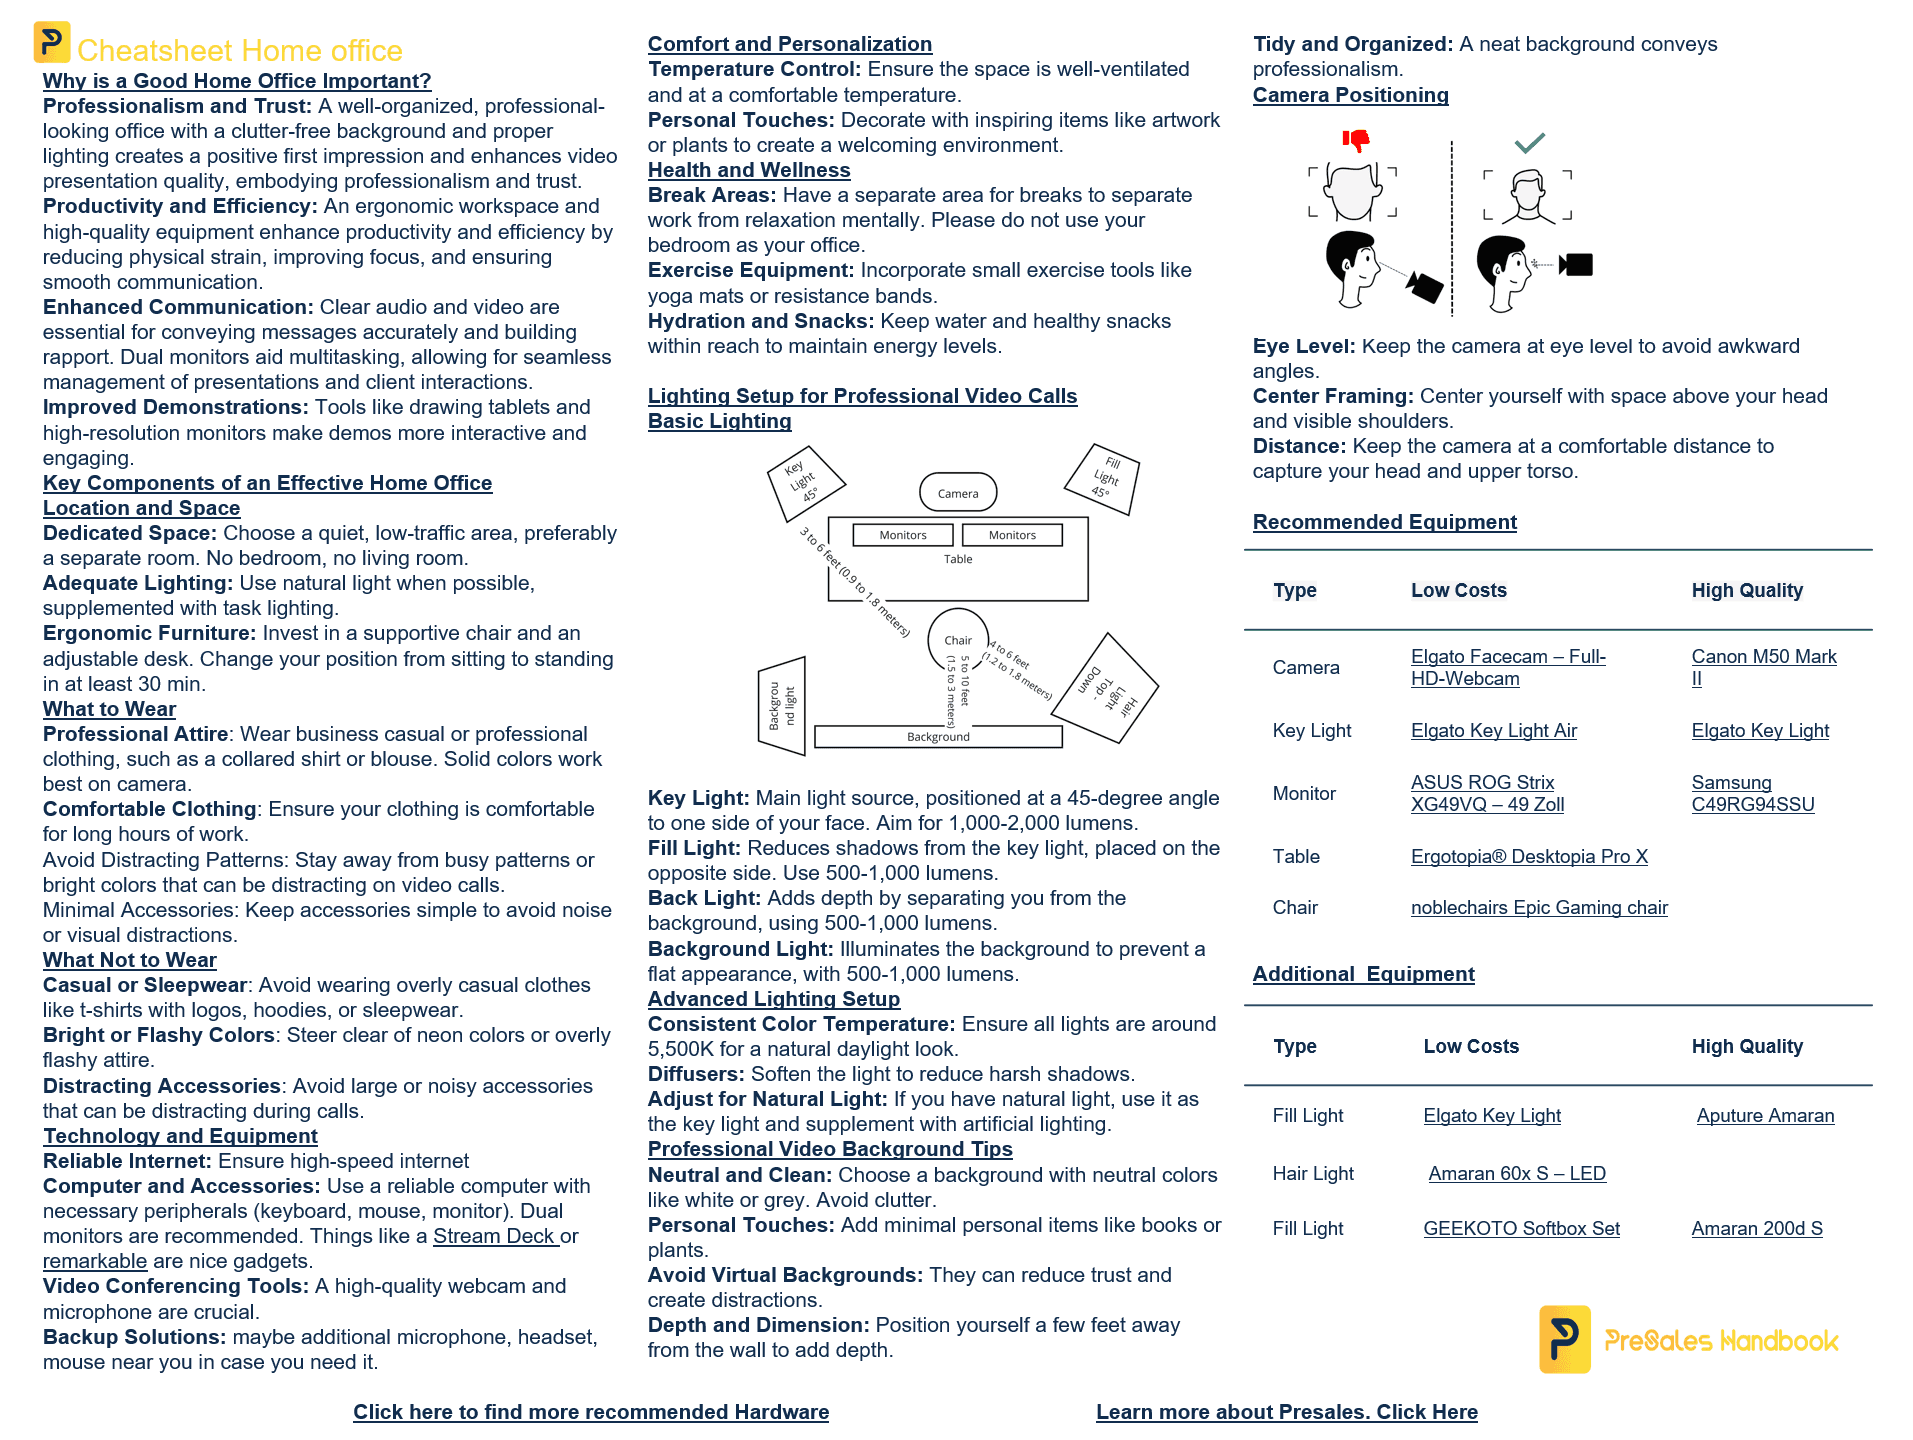
Cheatsheet Home Office Setup
Templates for this chapter
 PDF · 162 KB
Home office cheat sheet
Light, sound and camera setup for remote demos on one page.
From the blog
- 4 min read
The Multitasking Myth in PreSales: What Really Works?
Multitasking feels productive but costs focus. What brain research says, and how presales people can work in focused blocks.
Read more - 5 min read
Automation Isn’t Replacing PreSales! It’s Elevating It!
Automation takes repetitive work off presales teams so they can spend more time on discovery, strategy and real customer conversations.
Read more - 10 min read
The Zen of PreSales: Applying Japanese Techniques for Success
Japanese ideas like Kaizen, Shuhari, Ikigai and Nemawashi, applied to everyday presales work.
Read more
In the course
- How to set up your homeoffice?Members only
- Presenting OnsiteMembers only
- Presenting RemoteMembers only